
Complete Estelle’s training at Le Locle, then investigate the white shadow in Ruan. The Society’s experiments take the party through Zeiss, Grancel, Rolent, and Bose. In the 2026 remake of Trails in the Sky 2nd Chapter, the later chapters take you aboard the Glorious, through the four towers, and into Liber Ark. The route below covers the 2026 remake’s story progression and the puzzles that interrupt it. It contains story spoilers, but does not promise every treasure chest or collectible.
Prologue: Le Locle and Grimsel Fortress
After the opening scenes, leave Joshua’s room, meet Cassius on the castle terrace, and follow Estelle’s journey back to the Bright house. The training route begins later at Le Locle with Anelace. Collect Estelle’s equipment from her upstairs room, then sit opposite Kurt downstairs. He gives the pair their new Tactical Orbments. Speak to Phyllis for the cooking lesson and to Robert for Quartz. Make Mind 1 and Shield 1, equip them on Estelle and Anelace respectively, and meet Kurt outside before traveling to Balstar Channel.
Pull the bridge levers in Balstar Channel to connect its platforms. At the flooded section, operate the switch to the right of the entrance; the lowered water exposes the stairs. Descend, cross the next platforms, and use the remaining bridge controls to reach the corridor with a healing crystal. Kurt waits beyond it. This fight introduces S-Crafts and S-Breaks. Finish the battle, return to the lodge, speak to Robert about an Orbment slot upgrade, and use Estelle’s bed upstairs.
Choose to wake up when the gunfire starts. Go downstairs and fight the attacker. Winning this lodge battle earns bonus BP; continuing after a loss gives up that bonus. When Estelle and Anelace wake in Saint-Croix Forest, identify the Jaeger assailants as the people who carried them there. Examine the nearby camp, then follow the marked exit on the forest map. The healing crystal before the female Jaeger gives you a clear place to prepare. Her grenades punish the two characters for standing together, so separate them during the fight.
Back at the training lodge, examine the blood, broken spear, glass, communication equipment, empty food containers, and damaged map. The deduction is that the attackers moved to another base. Robert can help with Quartz before you leave for Grimsel Fortress, and the lodge beds still provide a place to rest.
Inside Grimsel, use the first gate’s nearby control room. In the following corridor, turn on the power in the room on the right, then use the gate panel in the room on the left. Continue to the stairs for 2F and its healing crystal.
If the corridor beyond 2F’s healing crystal is dark, follow its floor lights into the left-hand room. Take the Night-Vision Goggles from the chest and equip them on Estelle through her costume options. Continue to 3F and collect the ID Unit from the marked chest. The later gate needs that unit at its control panel. At the final confrontation, choose the bluff that says calling is unnecessary. Fight the last Jaeger, then watch the scenes that finish training and return Estelle to Grancel.
Chapter 1: the white shadow in Ruan
Choose Agate or Scherazard at the Grancel guild, then collect your boarding tickets at the airliner terminal. On the flight, speak to the marked passengers and crew. Lloyd gives you fishing equipment upstairs. Talk to your chosen partner, then sit down once the conversations are finished. On arrival in Ruan, report to Jean at the guild. His investigation sends you to three separate witness groups.
Start with the Ravens in the South Block. Their refusal to cooperate leads to a battle, after which they direct you to Belden at his house. Speak to him about the sighting. For the second lead, travel south along Aina Causeway to Air-Letten, ask Hahn about the witness, and question the guard he identifies. For the third, visit Mercia Orphanage north of Ruan. Theresa sends you to the Sunday school in nearby Manoria. Meet Kevin there, return with him to the orphanage, and hear the children’s account before traveling back to Ruan.
Report all three accounts to Jean. The election argument interrupts the discussion, so attend the confrontation and return afterward. Olivier joins the investigation. The testimonies differ in the direction the white shadow disappeared, and those directions point toward Jenis Royal Academy. Dorothy accompanies the trip as an escort. Protect her during encounters: her defeat can end the attempt even while your playable characters remain standing.
At the academy, speak to Hans in the student council room, then question Mick on the main building’s first floor and Patrick upstairs by the boards. Visit the auditorium and the girls’ dormitory, where Felicity and Reina provide another account. Return to the student council room when the interviews are done. After the sighting and subsequent scenes, the key Hans lends you opens the back gate to the old schoolhouse.
Read the card at the schoolhouse door before searching inside. Each clue points to an object that gives the next card:
- The hollow-flame clue points to the unlit lantern beside the upstairs landing. Inspect it for the next card.
- The southeast-facing student points to a desk in the first-floor classroom. Search that desk for the garden clue.
- The fallen head points to the broken pot on the eastern second-floor terrace. Search the pot to obtain the Old Key.
Take the Old Key to the locked door on the first floor’s eastern side. Inspect the dragon statue beyond it; the stairs it reveals lead underground.

Dorothy remains with you for the first Mouki encounter underground, where Burst is introduced. Keep her alive through that fight. She then waits near the entrance while the playable party explores farther. Find the route to the healing crystal before the final room. Blueblanc summons Storm Bringer there. Its Puppet Flaggers grant buffs to the remaining enemies when defeated; Anti-Sept removes the boss’s buffs. Earth Guard and Kloe’s healing give you ways to recover while you deal with the summons and the boss.
Ruan still has requests after the chapter’s main battle. Before leaving for Zeiss, revisit Hotel Blanche for the event with Nial that starts Election Office Outrage. Its investigation asks you to question people throughout the hotel as new topics appear; giving up ends the attempt. Winners Wanted is also available in this departure window and changes with your chosen partner. Finish these requests before boarding the next flight if you want their BP.
Chapter 2: the earthquakes around Zeiss
Report to Kilika, visit Professor Russel at the Central Factory, and investigate Wolf Fort. Question Pace, the rooftop guard, Bahm at the gate, and Henning in the rest building; return to Pace afterward. The next incident sends you to Sanktheim Gate. Talk to Dale, Talbot in the storeroom, Chesley on the roof, and Tammy in the cafeteria. The difference to identify is the earthquake’s duration.
Back at the guild, collect Russel’s measuring devices. Install them by the sign near Lieston Fortress’s bridge, at the stone circle on the Wolf Fort route, and inside Kaldia Tunnel through the factory basement. The stone-circle placement triggers a fight. Report to the factory’s fifth-floor operation room and identify Elmo Village as the source.
Mao provides the key for the village’s wooden door. Beyond it, wait for the hot-water geysers to subside before crossing. At the depths, Walter summons Abyss Worms. Glowing worms retaliate when struck; an attack hitting several glowing worms can trigger several counters. Avoid sweeping attacks into that state. Earth Arts heal them, while Fire and Wind can damage them.
Chapter 3: Renne’s trail through Grancel
Elnan sends you to Erbe Royal Villa. Search the courtyard benches, gallery objects, drawing-room table, West Guest Room 1, and Grand Hall lectern. Return to the lounge and look beneath Raymond’s counter before reporting failure: Renne is hiding there.
Back in Grancel, investigate the Calvard and Erebonian embassies, then the castle. Shea directs you to Hilda in the library; speak to Queen Alicia through the terrace and throne-room route. Visit Nial upstairs at Liberl News before reporting to Elnan. Renne mentioned an airliner, so choose the answer that she traveled by air.
When Renne disappears, follow her through Edel Department Store, the History Museum upstairs, the Fisherman’s Guild, Coffee House Baral, the East Block ice-cream stall, and the landing port. Her letter takes Estelle alone to Gurune Gate’s wall. Fight the drones with Kevin, return to the guild, then investigate the port warehouse and missing engine. The tank battle against Orgueille is followed by Kanone’s troops. Destroy the tank’s cannons with Arts and remove its Rage buffs with Anti-Sept; afterward, watch for soldiers reviving one another.
Chapter 4: the fog in Rolent
As Joshua, recover the Bobcat’s Ignition Key from the soldiers’ room in the stronghold, ascend to the ship, and fight through the escape. Estelle’s flight subsequently stops in Rolent. Investigate Elize Highway, Milch Main Road, and Malga Trail, returning to the guild after the final fog boundary.
Question the person attending each unconscious victim. Visit these four locations before reporting to the guild:
- The mayor’s residence, upstairs.
- Abend Bar, upstairs.
- The private residence immediately west of Abend Bar.
- The home south of Rolent’s western gate.
At the guild, choose “The lack of witnesses” for the common detail, then “Luke fell asleep” for the event associated with the woman in black. During the overnight stay at the Bright house, speak to Scherazard downstairs. The next morning, travel along Milch Main Road to Perzel Farm. Defeat the fog creatures, enter the house, and find the family unconscious. Kevin stays there while you return to the guild. The next destination is Mistwald, reached from Elize Highway.
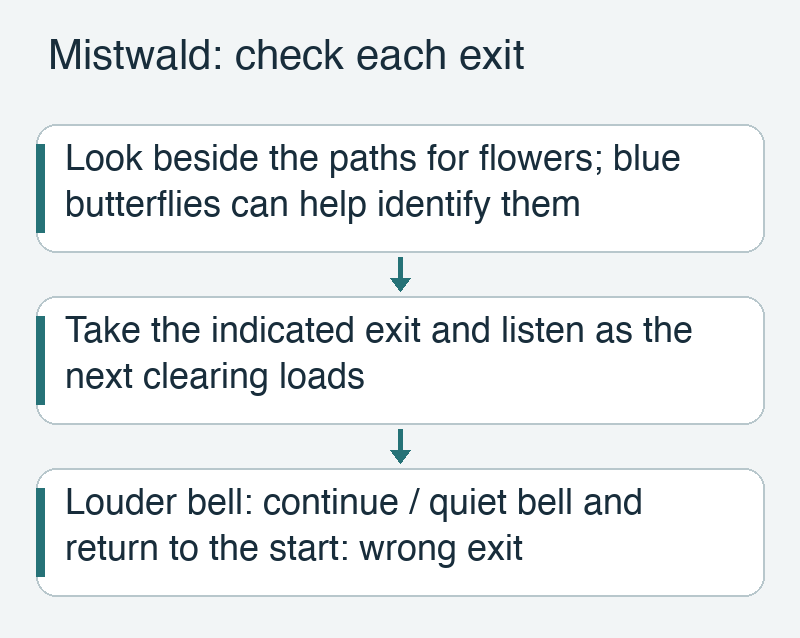
Save before entering Mistwald’s fog maze. In each clearing, inspect the paths for flowers; blue butterflies, when present, help draw attention to them. Take the indicated exit and listen to the transition: a louder bell confirms progress, while a quiet bell followed by the starting clearing means you chose incorrectly. Repeat this check in the next clearing. Several wrong exits cost the bonus BP. If preserving that bonus matters to you, reload your pre-maze save after a reset.
Beyond the maze, use Crafts against red-masked Zaqqum and Arts against purple-masked Jubokko. In Estelle’s illusion, ask Cassius about the locked room upstairs and speak to Lena outside. Return indoors and take the key from the cabinet in Cassius’s first-floor room. Unlock the upstairs room, retrieve the harmonica from its chest, and play it on the upstairs balcony to escape.
Chapter 5: the dragon in Bose
Lugran assigns three monster groups. Take New Ansel Path to Amberl Tower, the western highway to Krone Pass, and East Bose Highway to Nebel Valley. The Krone group is down a ladder. In the valley, continue past the Haken Gate turn; the hut’s bed provides healing. After all three groups, choose “They seemed scared” and return to Bose.
When the dragon attacks, choose to plan the rescue. Travel via West Bose Highway to Ravennue, speak to the village chief, and enter the mine north of the village to find Agate. Afterward, visit Crosner’s home beside the village chief’s residence before returning to Bose.
Attend the Arseille operation at the international landing port. Talk to the party aboard, sit in the cafeteria, and go onto the deck when prompted. The subsequent hunt returns to Nebel Valley: meet Whemler at the hut and take the marked mountain route. Against Ragnard, displacement can leave allies outside healing range. Prepare a shield before its attack at half health and reposition displaced characters before relying on area healing.
Chapter 6: the laboratory keys and Glorious
At Kingfisher Inn, Kevin restores Kurt’s memories and identifies the laboratory on Valleria Lake’s northwestern shore. Form the infiltration party with Kevin, cross the lake, and enter the facility. Grant waits on 1F; after the battle, collect the Red Card Key from his room’s device and use it to reach the first elevator. On 2F, equip Estelle’s Night-Vision Goggles for the dark room. A spare pair is available on this floor. Defeat Carna and collect the Green Card Key. Open the green gate on 2F and take the other elevator to 3F.

Defeat Anelace and take the Blue Card Key from the device. Return to 3F’s initial room and open its blue-reader gate to reach 4F. Fight the Joshua puppets on 4F. When the party awakens without Estelle, take Kevin to the laboratory roof to advance the scene.
During Estelle’s escape from the Glorious, cross Bow 2nd Level’s corridor to its eastern elevator and descend to Bow 1st Level. Use map north for the following directions. From the southeast lift, head west along the south corridor to the eastern inner cross-passage. Go north through it, then west along the north corridor. Before reaching the western electric barrier, turn south through the western inner cross-passage. Its exit is west of the south corridor’s barrier. Walk west to the southwest lift and continue onto the deck. Losing the solo Gilbert battle allows the story to continue; winning earns bonus BP.

After Joshua returns, re-enter the ship through the deck stairs. Enter the stern section for the route toward the hold. Check the map for active red barriers and use an open inner passage to reach the elevator for Stern 2nd Level. Cross that floor to the hold elevator. Pale Apache guards the escape; use Water or Wind Arts against it and keep healing supplies available for the two-character party. Defeat it to complete the reunion.
Chapter 7: Esmelas, Carnelia, Sapphirl, and Amberl
Use the Orbal Factory on the Arseille’s lower floor before asking Fey to lower the elevator. Complete the altered towers in this order: Esmelas, Carnelia, Sapphirl, then Amberl. The route directions below use north at the top of the map. Data Crystals are optional clues for the final chapter’s terminal; collecting them does not open the tower exits.
Platform routes through the four towers
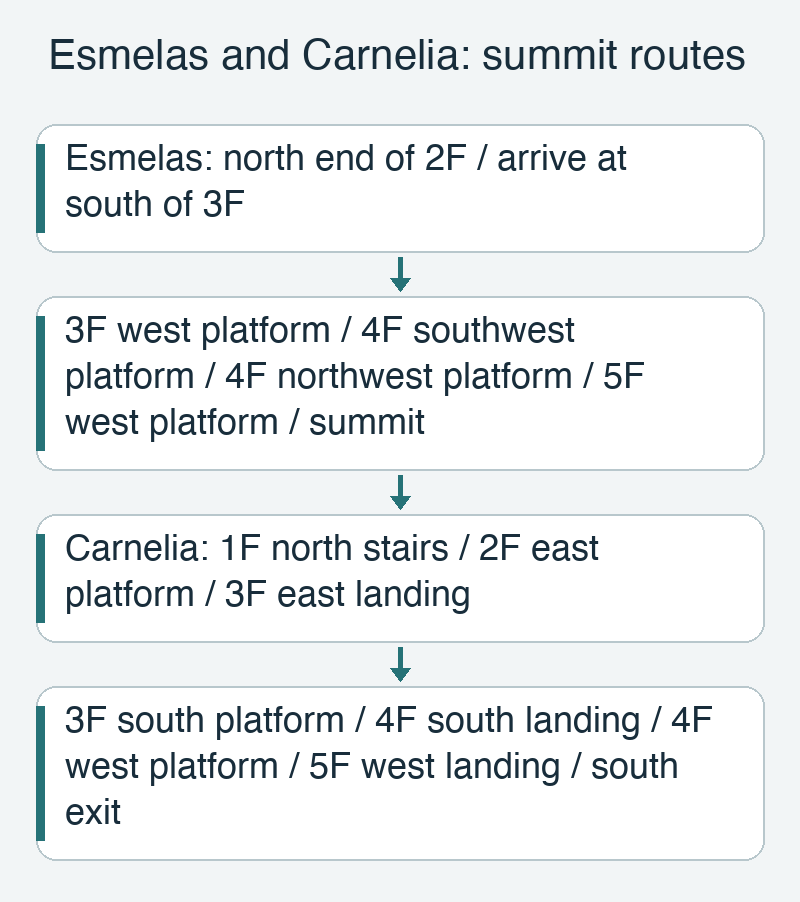
In Esmelas, take the transport platform at the north end of 2F. From the southern 3F landing, follow the connected walkway to the west platform. It takes you to southwest 4F. Walk to northwest 4F and take that platform to the west side of 5F, then follow the walkway to the summit. Pass through the electrical hazard without stopping; there is no nearby shutoff switch.
In Carnelia, use the north stairs from 1F, then the eastern platform on 2F. From its eastern 3F landing, follow the outer walkway to the southern platform. On 4F, take the western branch from the southern landing; that platform reaches west 5F. Follow the connected path to the southern exit. Move through the fire and heal on safe ground. The battle outside the tower does not have to be cleared before entry.
Sapphirl has a connected route across each floor. Follow each walkway to its far end and take the onward stairs or transport platform. If collecting Data Crystals, check the side branches on 2F, 3F, 4F, and 5F before leaving each floor.
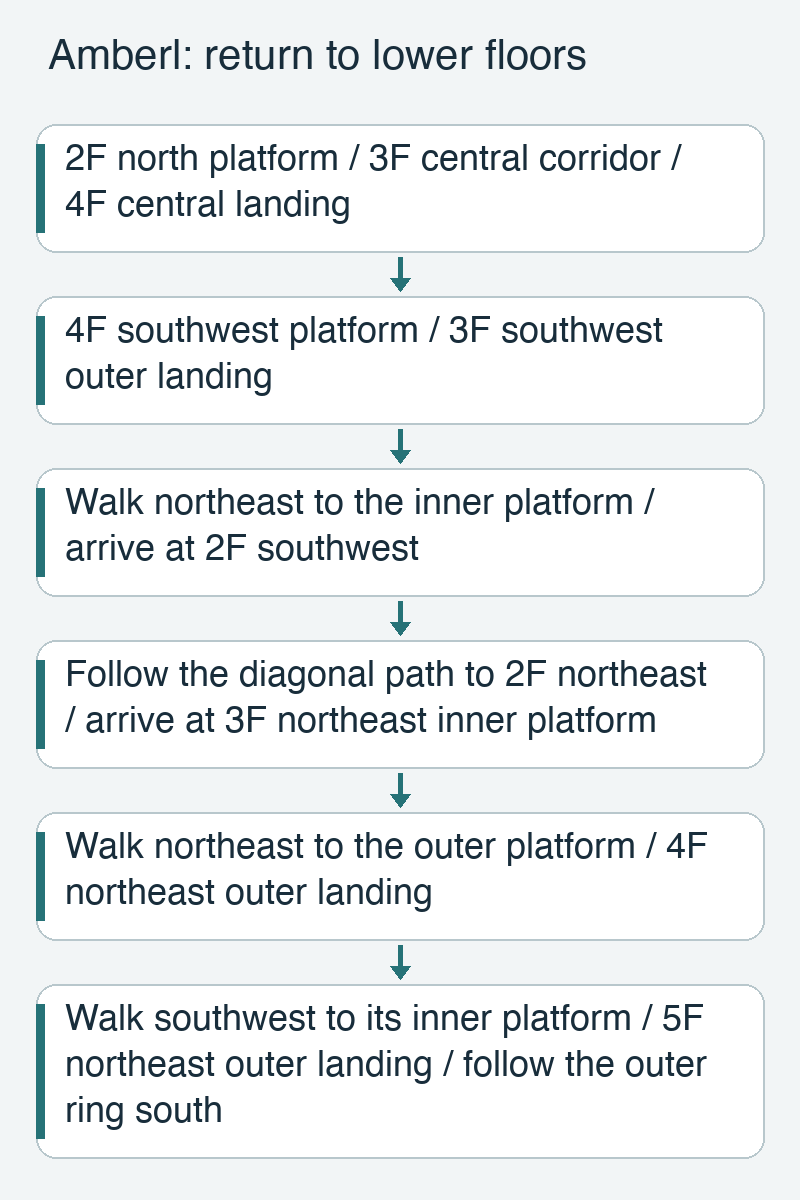
Amberl requires a detour through lower floors. From the north platform on 2F, cross 3F’s central corridor and take its northern platform to central 4F. Walk through 4F to the southwest platform, which sends you back to southwest 3F. Follow that isolated branch northeast to its inner platform, returning to southwest 2F. Take the diagonal walkway to northeast 2F and its platform. From northeast 3F’s inner landing, walk northeast to the outer platform. On northeast 4F’s outer branch, walk southwest to the inner platform; it reaches the outer ring on 5F. Follow that ring south to the healing crystal and summit exit. Cross the toxic gas promptly and recover afterward.
The crystals are grouped by tower: numbers 0-3 on Esmelas 4F, 4-7 on Carnelia 3F, one each from 8-11 across Sapphirl 2F through 5F, and 12-15 on Amberl 5F. Amberl’s central 5F landing ends at a chest; the route to the summit comes from the outer ring.
| Tower | Party requirement or useful preparation | Battle obstacle |
|---|---|---|
| Esmelas | Bring a way to shield against Blueblanc. | Clear his copies; Overdrive removes the transformation. |
| Carnelia | Zin must accompany you. | Steel Cougars survive a fatal hit and need another attack. Some of Walter’s attacks bypass invulnerability. |
| Sapphirl | Bring Scherazard and confusion resistance. | Use Arts on Jubokko and Crafts on Zaqqum. Hitting Luciola’s copy harms an ally. |
| Amberl | Prepare for Renne’s opening S-Break. | Pater-Mater follows her battle. Remove its Rage buffs with Anti-Sept. |
After each summit battle, return to the Arseille for the next tower. Once Amberl returns to normal, stay aboard for Russel’s analysis of the Data Crystals. When Weissmann contacts the ship, go to the forward deck to trigger the next story sequence.
Chapter 8: deliver the Zero Field Generators
After the Bose handover, the party has four Zero Field Generators. Equip one on each character who needs Arts during the shutdown. Estelle delivers units to Ruan, Zeiss, and Rolent; Kloe’s group handles Grancel. One unit remains with Estelle’s party after her three deliveries. Finish regional monster requests before each handover if you want more Arts users for those fights.
Travel west from Bose through Krone Pass and deliver a generator to Jean at Ruan’s guild. If you want to complete the Academy Attack request, take its northern detour now, before continuing toward Zeiss. Enter Vista Forest Road to trigger the dog encounter and rescue the academy students. Joshua scouts the occupied campus; Anelace and Kurt join the rescue. Clear the Jaegers and Gilbert’s group, then return to Ruan after the Campanella scene. Complete this branch before finishing the deliveries and contacting Grancel Castle.
For the southbound route, go downstairs in Hotel Blanche and take the ferry to Ruan’s South Block. The raised bridge cannot be used during the shutdown.
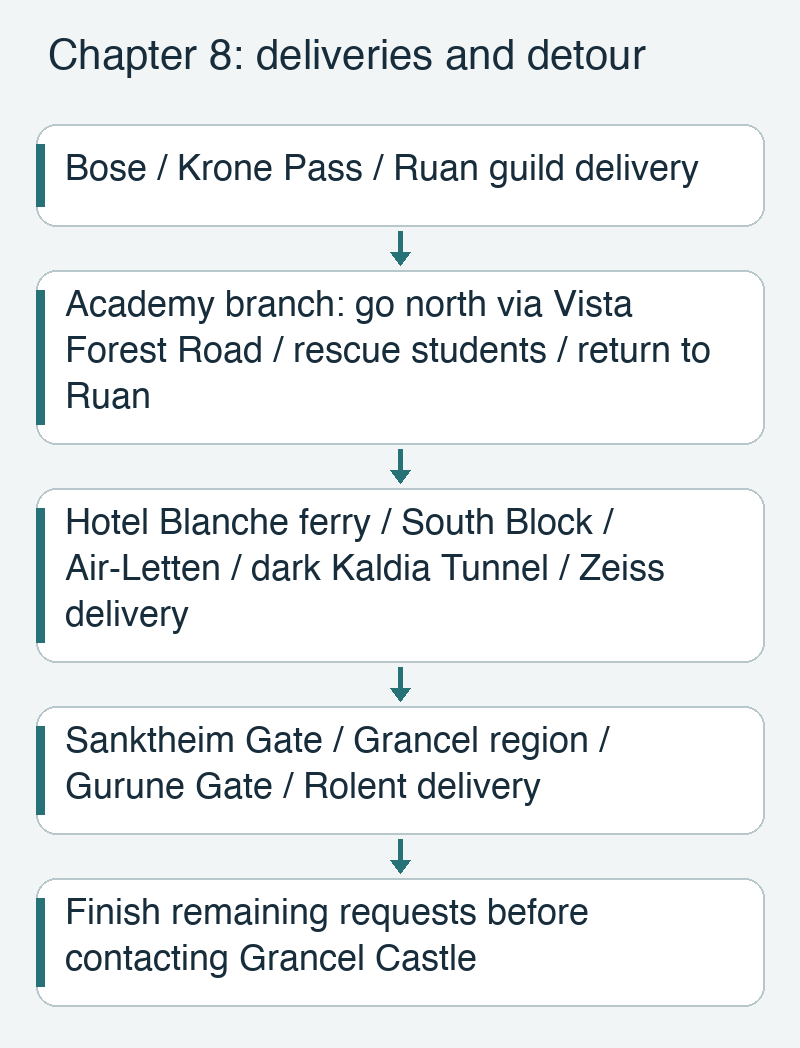
Continue south to Air-Letten, enter Kaldia Tunnel from its rooftop, and equip the goggles for the dark passage to Zeiss’s factory. Deliver the next generator to Kilika.
Leave Zeiss eastward through Ritter Roadway and Sanktheim Gate. Cross the Grancel region toward Gurune Gate, then follow Elize Highway to Rolent. Give Aina the next generator. Contacting the castle afterward ends free travel, so finish requests first. When ready, answer the summons, travel back through Gurune Gate, fight into Grancel Castle, and reach the Royal Keep through the terrace.
After the capital crisis, escort Kloe to Haken Gate for the border negotiations. Finish those scenes and return aboard the Arseille. With its larger Zero Field Generator installed, the ship can take the party to the floating city above Valleria Lake.
Final chapter: Liber Ark’s terminals and Axis Pillar
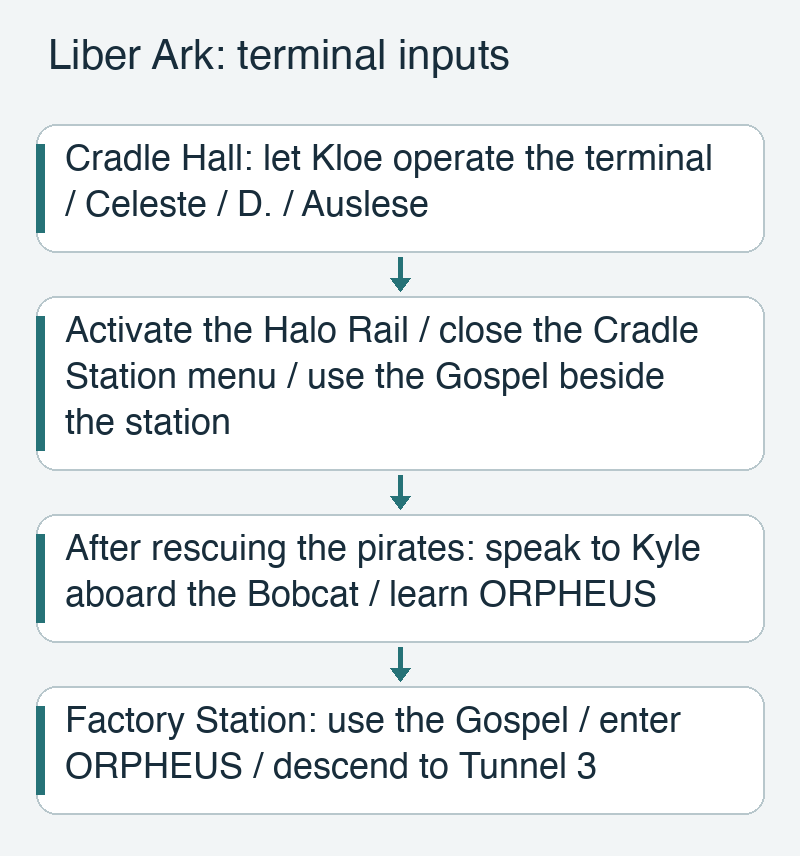
Activate the first Halo Rail terminal and open its gate. Cross Underground Tunnel 1 into the Residential District and rescue Josette. In Cradle Hall, have Kloe operate the terminal and select Celeste, D., Auslese. Activate the Halo Rail connection, close the Cradle Station menu, and use the Gospel while standing beside the station. The Gospel opens the gate to the next underground route.
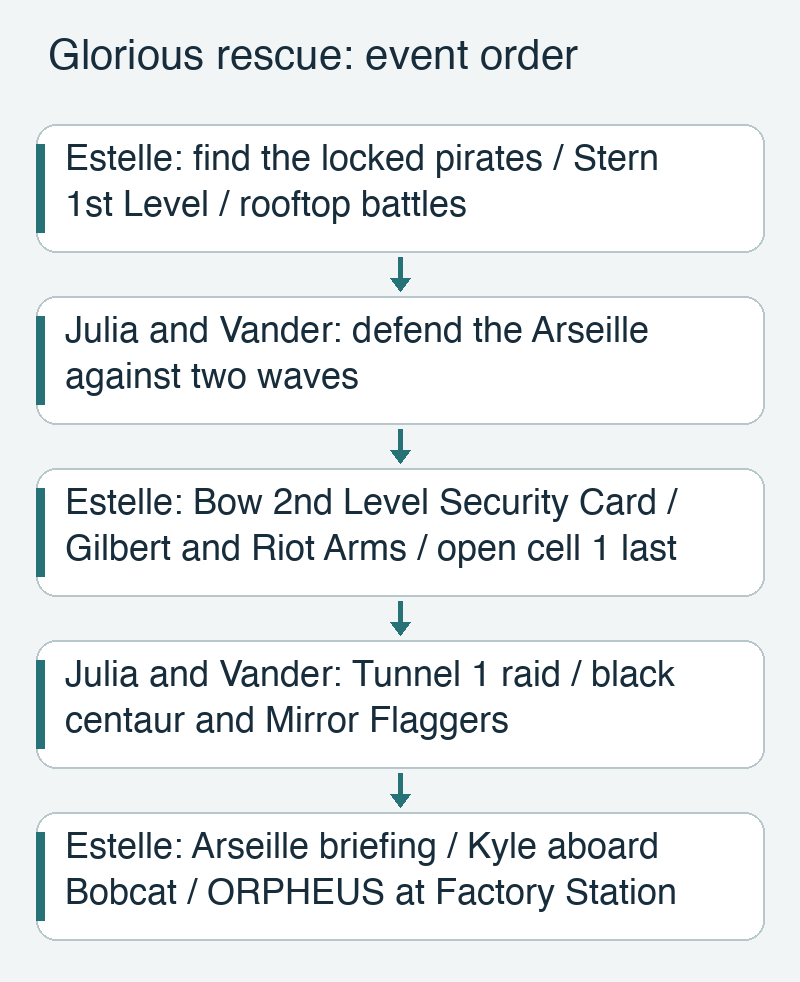
Bring Josette when boarding the Glorious in the Industrial District. Check the locked cells holding the pirates, return to the entrance elevator, and take it to Stern 1st Level. Reach the rooftop and defeat the three Pale Apaches and the Spindolls that follow. The story now switches to Julia and Vander aboard the Arseille: equip their four-person defense squad and defeat both enemy waves.
When control returns to Estelle, cross the ship to the elevator for Bow 2nd Level. Find the Security Card in a room chest. On the way back to the pirates, defeat Gilbert and Riot Arms. Search the other cells before opening cell 1, which advances the story.
The second switch to Julia and Vander takes them into Underground Tunnel 1 to stop the attacks at their source. Defeat the black centaur Archaism and its Mirror Flaggers. The Flaggers leave buffs on their allies when defeated; remove those buffs and Reflect with Anti-Sept All or a suitable Craft.
Back with Estelle, the first Gospel attempt at Factory Station leaves the password lock unresolved. Return to the Arseille for Julia’s briefing, then speak to Kyle aboard the Bobcat. He provides ORPHEUS. Use the Gospel again at Factory Station and enter that password. Descend through the opened route to Underground Tunnel 3 and Axis Pillar.
Activate the Halo Rail near Axis Pillar and use it to return to the Arseille before climbing. Julia and Vander are now available for your party. Defeat Riot Claw at the entrance. The Enforcers wait on successive floors: Blueblanc on 2F, Walter on 3F, Luciola on 4F, and Renne with Pater-Mater on 5F. Bring Zin for Walter and Scherazard for Luciola. Operate the terminal after each victory to open the onward route.
Pater-Mater can revive Renne if she falls first. Lower both enemies’ HP before committing your finishing attacks; an area Craft that can defeat both is a useful way to prevent the revival. If Pater-Mater has Reflect, dispel it before using Arts. Prepare healing and shields before Renne’s opening S-Break.
Loewe waits at the summit with Riot Sabers. The story permits continuation after a loss. After his scenes, take the large elevator behind the arena toward the Core Sector. Joshua is absent during Reverie Dragion, so check the remaining party’s healing and damage options.
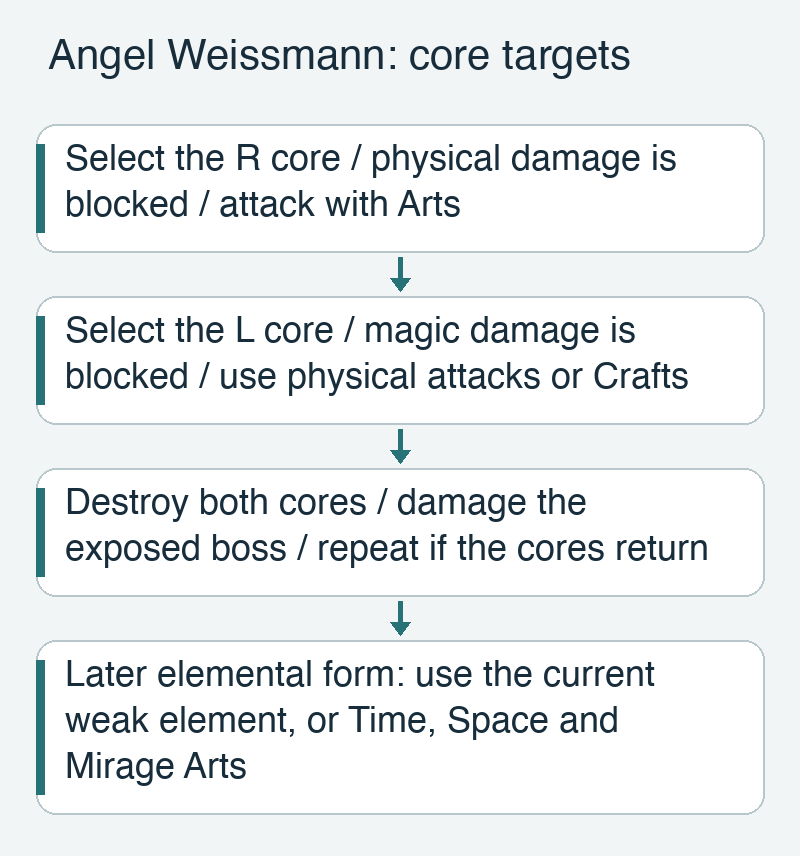
Save and prepare healing, buff removal, and both physical and Arts damage before the final sequence. Use Anti-Sept to remove Weissmann’s Reflect. After the intervening fights and cutscenes, Angel Weissmann enters the core phase. Here, choose your attacks by the target list’s R/L labels:
- The R core blocks physical damage. Attack it with Arts.
- The L core blocks magic damage. Use physical attacks or Crafts.
Destroy both cores before attacking the main body, and clear them again if they regenerate. When the boss enters its later elemental form, physical attacks stop working; use its current elemental weakness or Time, Space, and Mirage Arts. Move characters off marked floor tiles before they vanish, or interrupt the casting with Impede.
After victory, the main escape route collapses. Backtrack with Estelle and Joshua to the front of Axis Pillar, then enter the emergency evacuation tunnel toward the Arseille.