
Start Cyan Heart by entering 19651112 at the opening terminal. Inside the facility, unlock Site A-1’s control rooms and fix the initializer colors before trying its exit. The later Main Gate code is 3572, and the Orbital Tram administrator ID is 329487. This walkthrough follows Sarah through the facility’s machinery puzzles to the beach ending, with puzzle and ending spoilers.
Opening terminal and Site A-1
In the snowy opening, enter the small building and examine the paper beside the terminal. Its two handwritten lines form the password 19651112. Enter all eight digits at the terminal. If you reach a BSP screen saying that no executable program cassette is inserted, open the cassette controller and use Connect Cassette at the empty slot. Return to the main monitor once the program is connected, then leave through the door and approach the Cyan figure outside.
When Sarah’s facility recording begins, the CSZ8x2 camera supplies your view, minimap and conversation log. Interactable machinery receives a marker when you face it. Move close enough for the interaction prompt and press E. On a computer, E opens its control panels. When HOLD RIGHT CLICK appears later, keep the right mouse button held and point the camera at the marked memory source.
The first substantial puzzle is in the dark Site A-1 room. Open the computer and use the Gate Lock Mechanism panel to release the Cyan Initialization Apparatus Control Room and Observation Room. The exit toward Cyan Initialization Space still needs a working link. Open the initializer controls on the left side of the computer interface, then leave the room to inspect the three colored electrical boxes in the passage to the left.
Cyan initialization colors
The initializer panel shows three boxes, each with two colored squares. Treat the panel as a diagram: identify its left box, middle box and lower-right box before changing colors. The arrangement below is the one that produces Link verified. Please close this display.
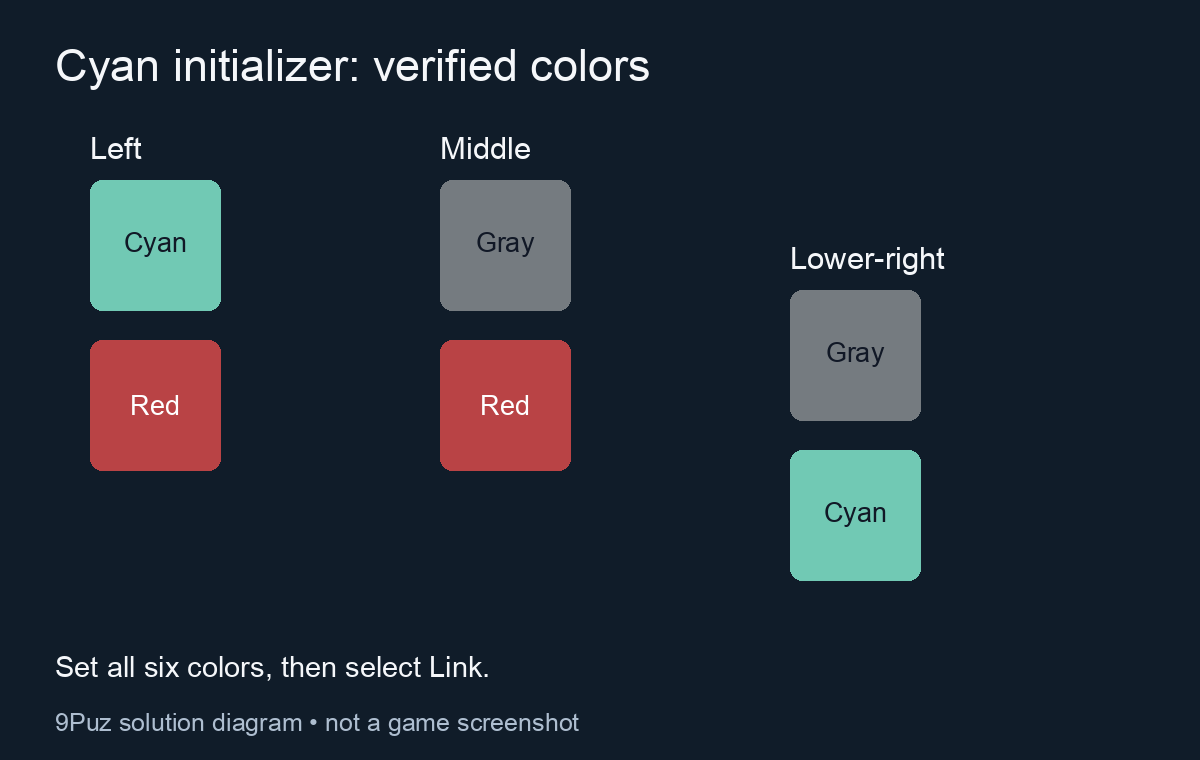
| Panel box | Top square | Bottom square |
|---|---|---|
| Left | Cyan | Red |
| Middle | Gray | Red |
| Lower-right | Gray | Cyan |
Use the Link control after arranging all six squares. If you still get a link error, check the gray squares first: both the middle and lower-right boxes have gray at the top, but their bottom squares differ. The middle ends in red; the lower-right ends in cyan.
Close the verified display and return to the Gate Lock Mechanism panel. Release the exit into Cyan Initialization Space, then enter that area. The shutdown sequence ends the first cassette and introduces the camera’s memory interaction. Hold the right mouse button when prompted, with the marked source in view, so the Cyan scene can play.
Locker room code and the server sequence
After the shutdown, follow the passage into the brighter furnished rooms. The next Gate Lock Mechanism panel has two entries: Main Gate and Locker Room. Release the Locker Room first and examine the room beyond it. Return to the panel, choose the locked Main Gate and enter 3572. The keypad closes and the gate’s padlock disappears when the code is accepted. Use that doorway to reach the open colony walkways.

Continue along the walkways and enter the server area. A bright, marked memory source near the racks lets you replay a Cyan figure’s movements. Hold the right mouse button on that source and watch which drives the figure touches. There are five interactions to reproduce, in the same order.
- Watch the complete memory before pressing any drives. Follow the figure’s stops, including the turns between rows.
- Walk to the first drive it touched and interact with that drive’s marked panel.
- Repeat the second, third, fourth and fifth interactions in order. Use the individual interaction markers to distinguish neighboring drives.
- After the sequence, return to the computer for the opened route.
Return to the bright source if you lose track of the sequence. Watch the figure’s hand at each stop: the surrounding red and cyan lights belong to neighboring drives, so aim at the individual drive it touches. Reproduce the five stops, then check the computer for the opened route.
Beyond the server section, the route passes more balconies, rooms and Cyan memories before reaching the chase. Use the marked memory sources along the open route to play the scenes and restore the objects they show. When the route leads into the darker corridor with the next memory source, locate the computer room to the left before starting the encounter.
The chase and the gate stuck at 68%
Hold the right mouse button on the marked source to trigger the encounter, then run left into the computer room. Open its terminal and start the Gate Lock Mechanism operation. The panel shows observation windows above a progress bar and initially tells you to keep the display open.
The progress stops at 68.00%. Once it has stalled there, leave the terminal and go to the nearby area with the red carpet. Interact with the computer in that area, then return to the original Gate Lock Mechanism terminal. Reopen its display and let the operation finish. Waiting at the first computer without visiting the other one leaves you at the stalled percentage.
Use the opened gate to continue to the lift-related section. Its control panel lists the Individual Research Lab Building and Employee Hoist, with automatic locks caused by increasing Cyan concentration. The concentration mechanism must be fixed before this part of the route opens. Enter the chamber containing a crane, a central platform of coffin-shaped sockets, and two walls of empty receptacles.
Where to put the four coffin sockets
Read the Activation Mechanism Placement Note beside the crane controls. Its L and R diagrams identify four required receptacles. Place two sockets in the first two positions of the left wall’s top row, and two in the right wall’s bottom row. Use the note’s L and R labels to orient yourself before moving the crane.
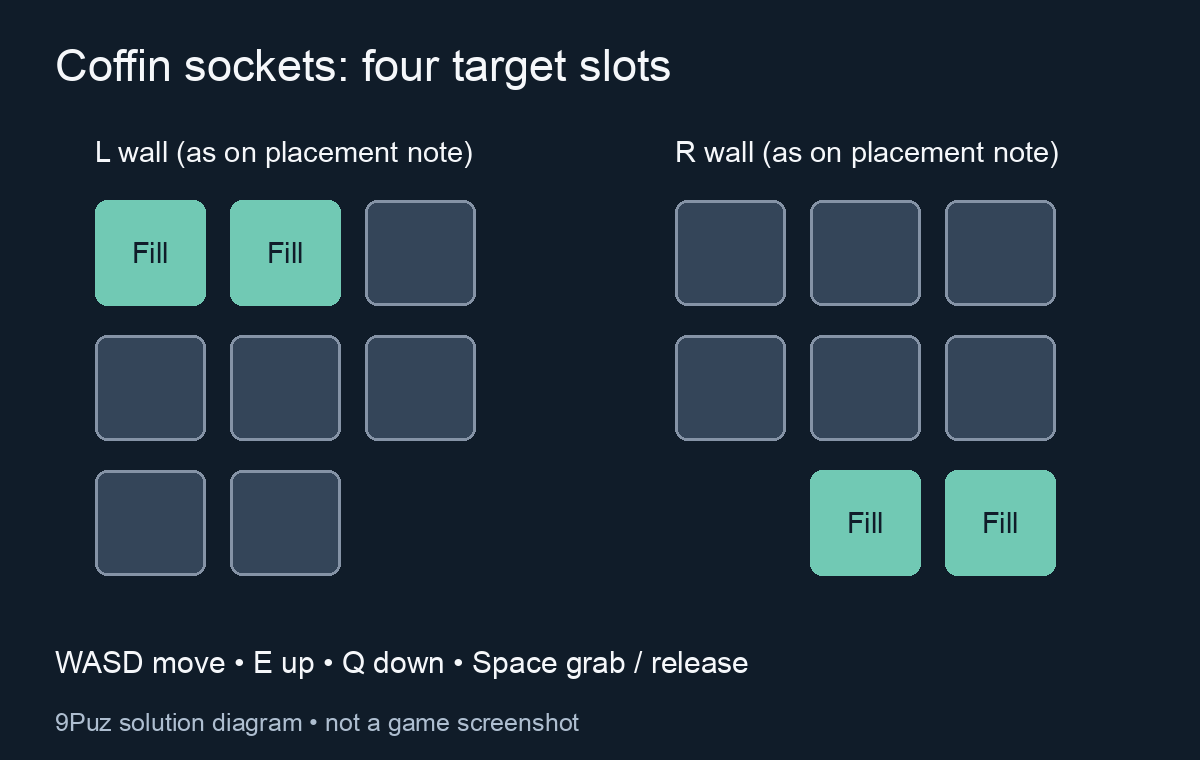
The crane controls are WASD for horizontal movement, E to raise it, Q to lower it, and Space to grab or release a socket. Start over a coffin-shaped socket on the central platform, lower the crane to it, and use Space to pick it up. Raise it before transporting it toward a wall so you have room to line up the placement.
Position the crane at one of the four designated receptacles, adjust its height with E or Q, and release the socket with Space. Repeat for the other three targets. The left pair belongs at the top; the right pair belongs at the bottom. Filling convenient empty receptacles elsewhere does not match the placement note.
When the four sockets are installed, return to the Mechanism Execution Panel. It should show STATUS: READY. Select Link to run the Cyan Concentration Adjustment Process. This is the step that adjusts the floor’s Cyan concentration and releases the research-lab route; placing the final socket alone does not run the process.
Enter the newly accessible research-lab area and inspect the marked documents and recording. Follow the recording through the break in the wall. After the objective changes to Head to the hoist, return toward the hoist and follow the vertical passage to the next section. Look up and down through the shaft to locate its continuation. The transition leads into the fourth cassette, Sarah was 12 years old, where Copy and Paste become central to the puzzles.
Copy, paste and the cooling-water pump
The first Copy tutorial points you toward a glowing orange machine in a small side alcove. Aim at it and use the camera’s right mouse interaction to take its high temperature when Copy appears. Carry that heat to the ice-covered mechanism nearby and use Paste. Melting the ice opens the way into the pump section.
The temperature or energy currently carried by the camera appears on the left side of the screen. Check that label when a paste does nothing. This section requires high temperature, low temperature and kinetic energy at different points, so you will return to the same sources several times.
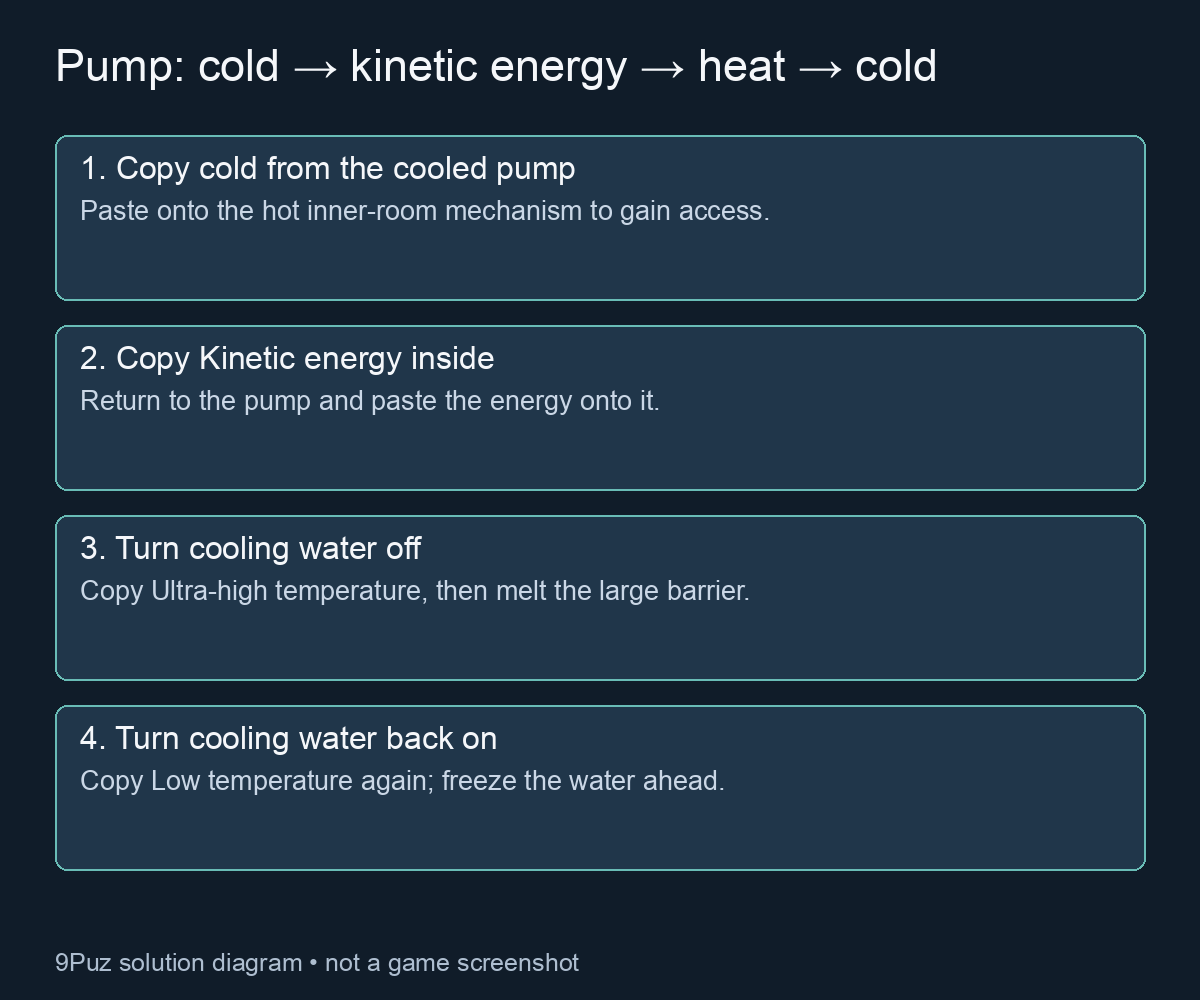
Open the inner room with cold
Locate the large circular pump and the Cooling Water Management Panel beside it. The pump area supplies a low-temperature source when its cooling water is operating. Copy that cold, then return to the earlier side room and paste it onto the glowing hot mechanism that blocks access to its inner section. Once it cools, you can enter the room behind it.
Inside, use the marked mechanism to obtain Kinetic energy. The orange source here is required for powering the pump. If the camera still says Low temperature when you leave the inner room, you have not yet copied the energy needed for the next step.
Make the pump produce ultra-high temperature
Return to the pump, restore its marked Cyan machinery with the right mouse button as needed, and paste the kinetic energy onto it. Switch off the cooling water at the Cooling Water Management Panel. The precautions beside that panel explain that a running pump without cooling water overheats; this is how you create the hotter source needed for the large ice obstruction.
Copy from the overheated pump. Confirm that the camera now reads Ultra-high temperature, then carry it along the corridor to the large frozen barrier and paste it there. The pump’s hotter energy opens the route into the plant research area.
Turn the cooling water back on
You still need cold after melting that barrier. Return to the Cooling Water Management Panel and turn the water back on. Copy low temperature from the cooled pump area, then take it into the plant research rooms and freeze the water blocking the route. After the water freezes, follow the interior passage and the stairs on the right to the upper computer and greenhouse.
If you arrive at the water with Ultra-high temperature still on the camera, retrace the corridor to the pump. Re-enabling the water changes what the pump can supply, but it does not replace the energy you are carrying until you copy again. Copy the cold source before attempting another paste.
Greenhouse flower colors and the lower lever
Find the Greenhouse ID Verifier panel among the flower beds. Its ten buttons form an open rectangle: four across the top, then three down each side. Set the colors as follows, reading the top row from left to right and each side from top to bottom below it.
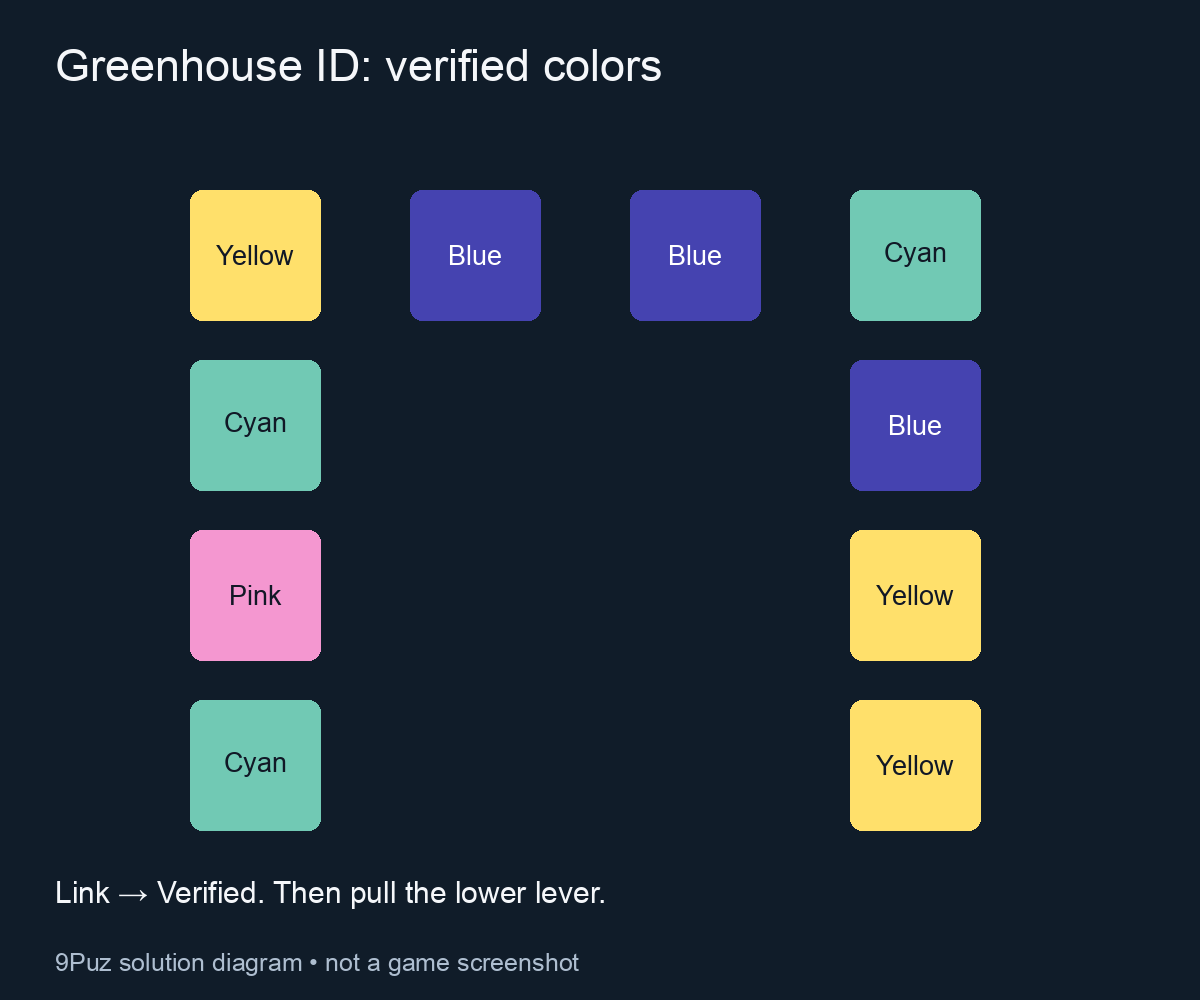
| Part of panel | Colors in order |
|---|---|
| Top row, left to right | Yellow, blue, blue, cyan |
| Left side, top to bottom below the row | Cyan, pink, cyan |
| Right side, top to bottom below the row | Blue, yellow, yellow |
Choose Link after setting all ten colors. The panel changes from Mismatch to Verified when the arrangement is correct. If it still says Mismatch, check the bottom-right button: it must be yellow, even though the button above the side column is cyan.
Leave the verifier and find the lever in front of the flower beds on the lower walkway. Pull it, then return upstairs to the Plant Research Lab 3 computer. Use its Link control to activate the Main Gate. Verifying the colors is only one part of opening the route; the lever and upper computer complete it.

Follow the opened passage through the glass-sided colony section toward the small gate and lift route. Examine the marked records encountered on the way and let the recording scenes finish. The next mechanical obstacle is in the residential sector, where a pair of computers reports locks for the Daycare, Communal Bath and Lift.
Restore the residential machines to unlock the lift
In the control room, one computer displays the Gate Lock Mechanism panel and the other monitors Cyan concentration adjusters. The monitored rooms are Dining Hall, Daycare and Communal Bath. The gate panel says it will disengage its locks automatically once safety is confirmed, so inspect those rooms and restore their machinery before returning to the lift.
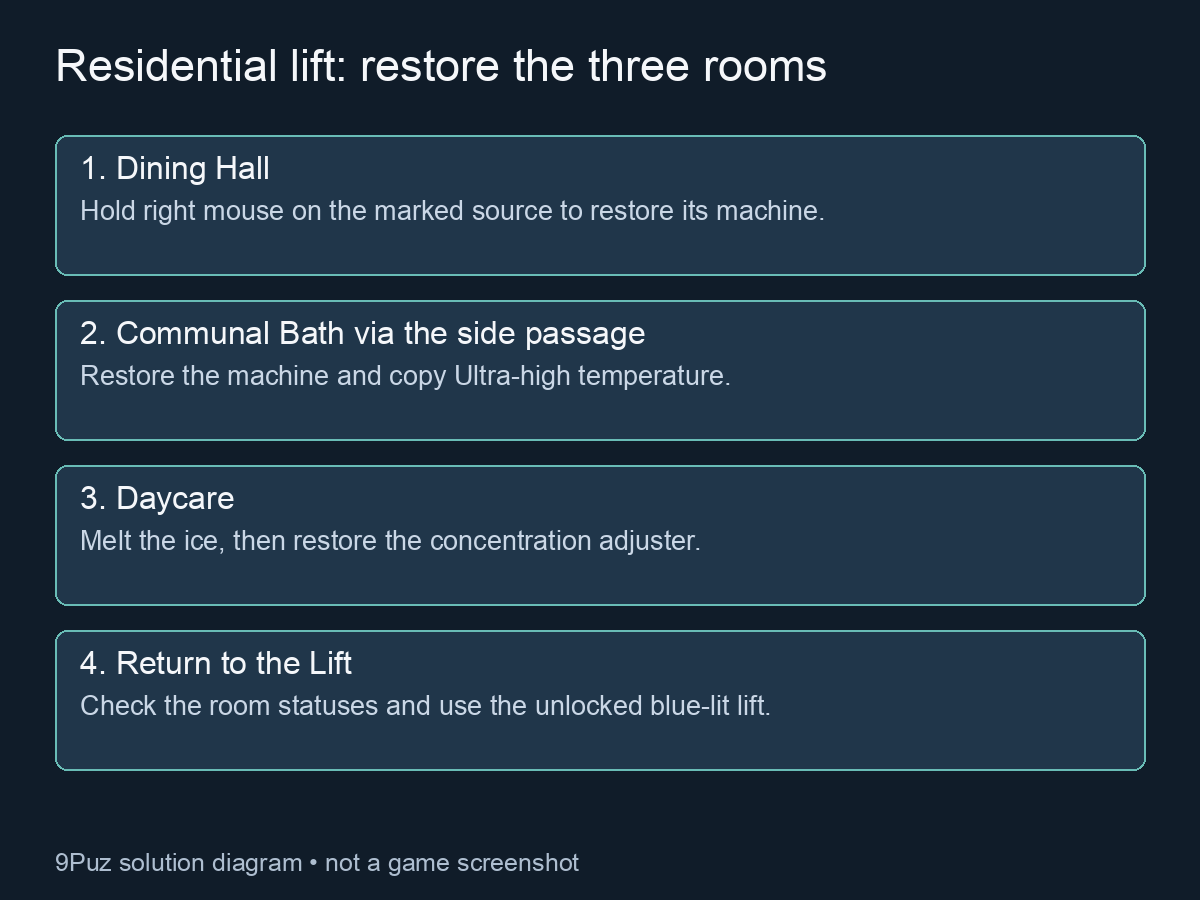
- Go to the Dining Hall and hold the right mouse button on its marked Cyan source. Let the memory restore the concentration-adjustment machine.
- Inspect the frozen Daycare mechanism, then leave it for now and take the side passage toward the Communal Bath. Follow the stairs down into the bath area.
- Use the marked source in the Communal Bath to restore its machine. Once the orange hot machinery is available, copy its ultra-high temperature.
- Return to the Daycare, paste the heat onto the frozen machine, and use its Cyan interaction to restore the adjuster.
- Return to the control area and check the room statuses. Once the required machinery is restored, the Lift lock clears and you can use the blue-lit lift.
The direct residential gates stay locked until the concentration problem is resolved. Reach the Communal Bath through its side passage and bring its heat back to the Daycare. Once the ice is gone, finish the Daycare’s memory interaction to restore the adjuster. If the Lift remains locked, check the monitoring computer and return to whichever room still needs its machine restored.
Orbital Tram login and the beach ending
Ride the lift, then follow the office route through the warmer-colored rooms. Examine the marked records before crossing toward the observation facility. The fifth cassette, Sarah is., leads through the narrow connecting corridors and onto the tram platform.
At the platform, inspect the terminal that displays Tram Administrator ID. It gives Tram Management ID: 329487. A separate Broadcast Mail window contains 19651112, the number from the opening. For the Orbital Tram login, use 329487.
Open the Orbital Tram Operation Panel and enter the six-digit administrator ID. After login, the tram diagram and track display appear, with the tram status shown as PREPARING. Select Link to prepare the tram. When its status changes to READY, close the display and let the connection and recording sequence play. The route continues beyond the platform after the scene.
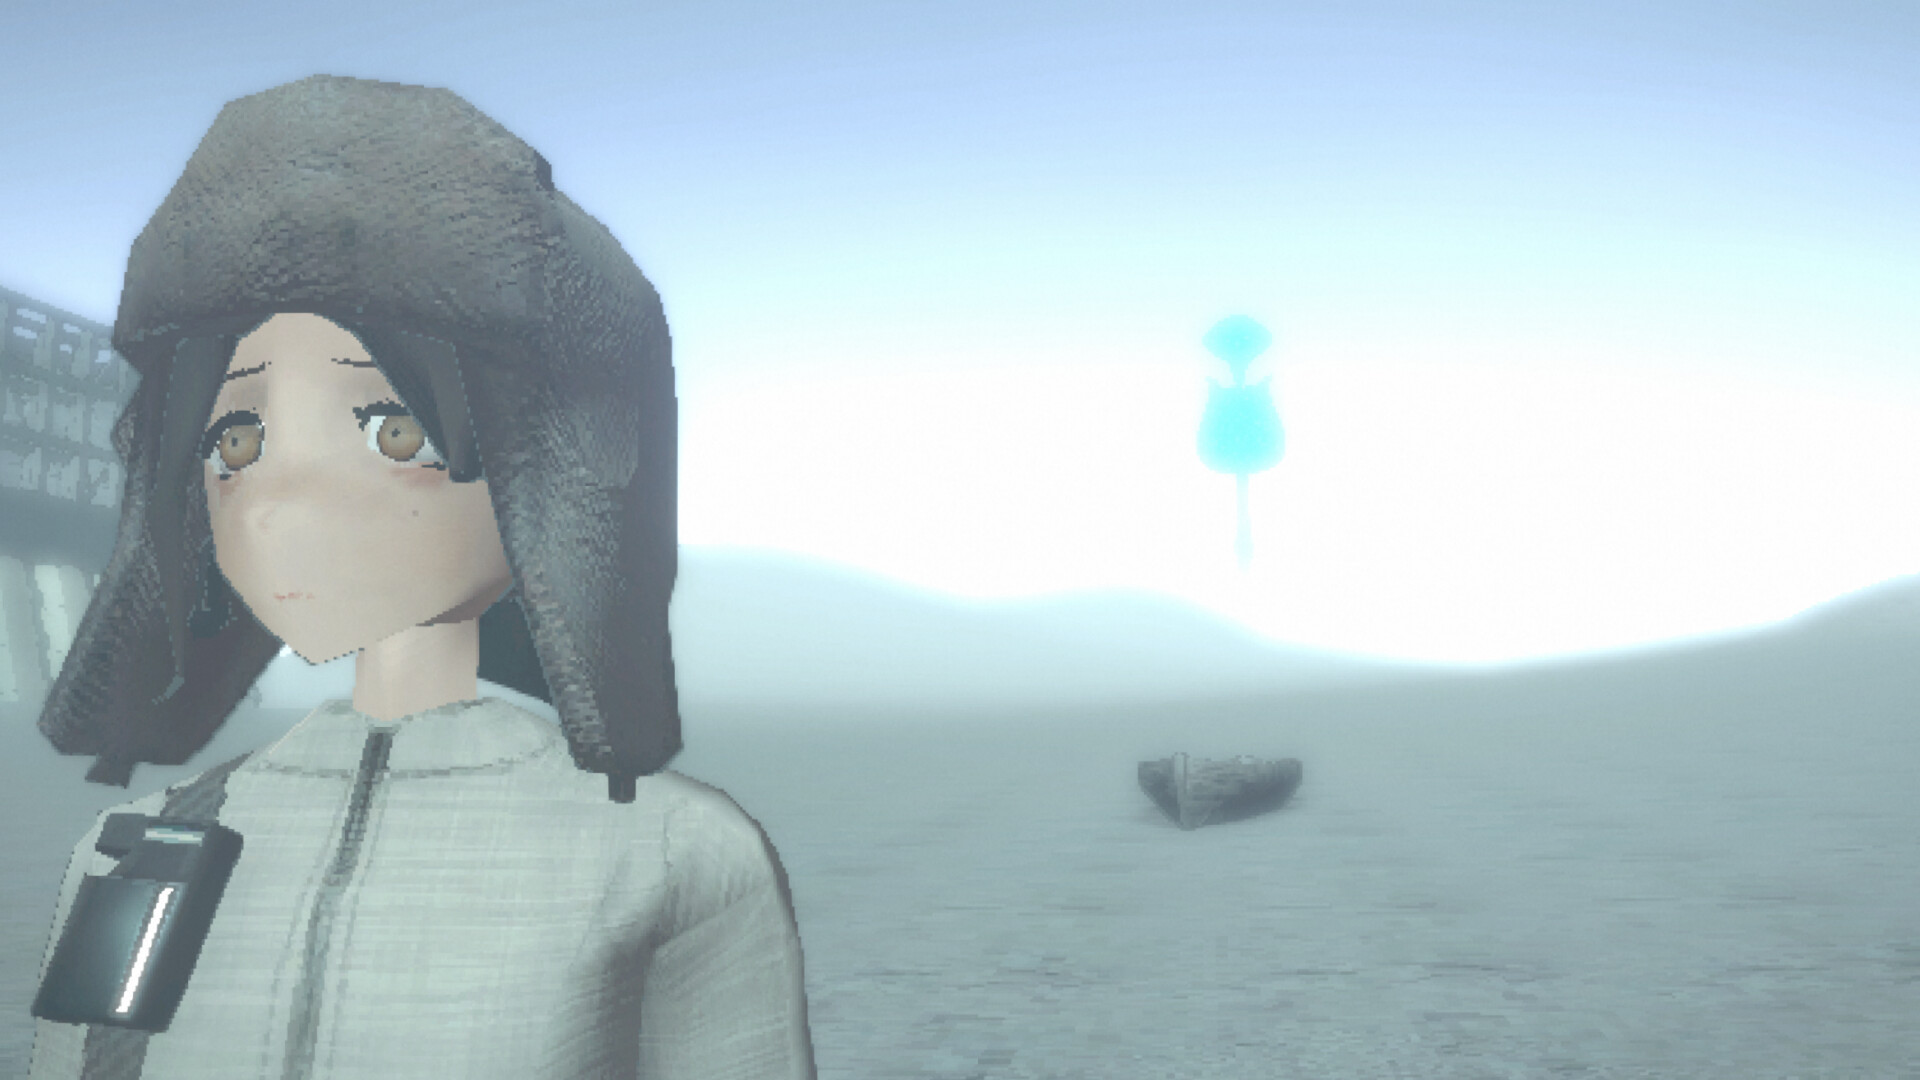
Take the passage under the structure and head out onto the beach. Walk across the sand toward the Cyan figure near the low stone structure. Approaching it triggers the final scene with Sarah and the figure sitting together, followed by the closing text and credits.
To revisit a recording or puzzle after the ending, open Chapter Select on the title menu. It offers five cassettes: Retrograde Cyan Heart, Survive Syndrome, Simulacrum, Sarah was 12 years old, and Sarah is. The game’s current release details are on the official Cyan Heart Steam page.