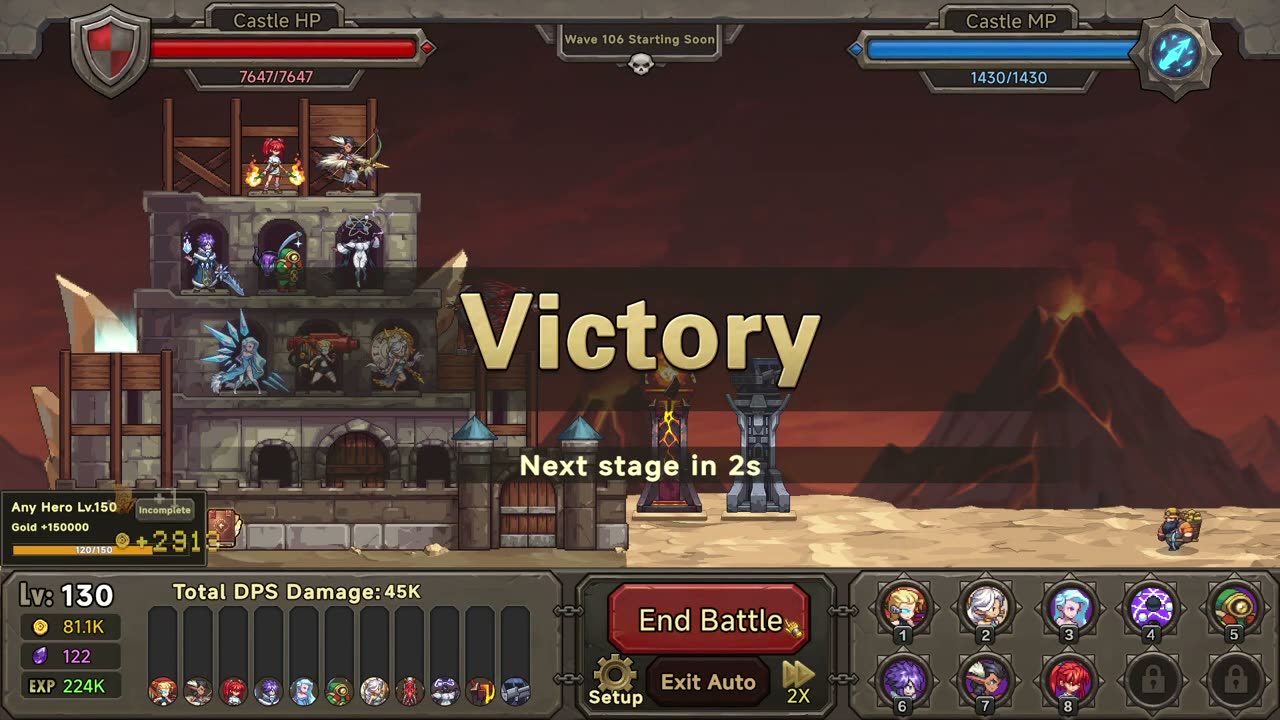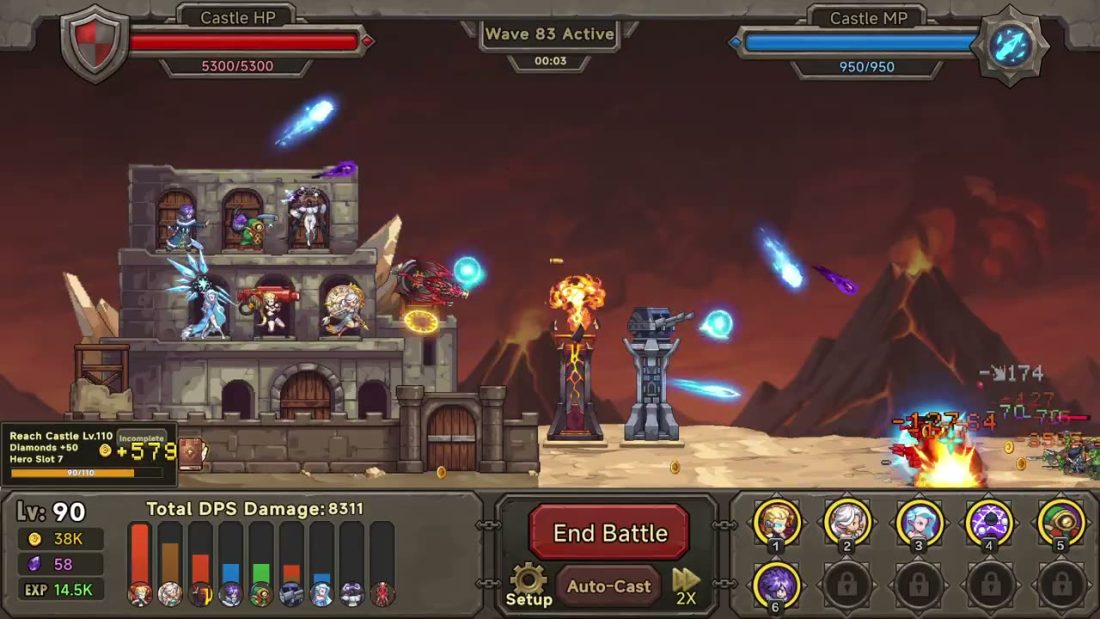
Deploy Flame Gun and the Siegebow cannon, build the Mine and tavern, then spend wave rewards on castle and unit levels. Open Training Grounds at Castle Level 20 and the Talent Bureau at Level 60, filling the additional hero and turret slots as you go. Continue the ordinary waves after a failed Rift raid; defeating Red Dragon is not required to reach Wave 101.
These steps follow the English demo of Legend of Defenders, including its early unlock requirements. The full release accepts demo save progress. This route ends after the first 100 waves, before later Rift bosses and the Demon Lord Tower.
Deploy Flame Gun and build the first support facilities
Open the character panel, select Flame Gun in the Hero tab and press Deploy. Close the panel and press Battle! to start Wave 1. Flame Gun starts firing when the fight begins. When the wave finishes, use Castle Upgrade at the lower left; the opening tutorial asks you to raise the castle to Level 5.
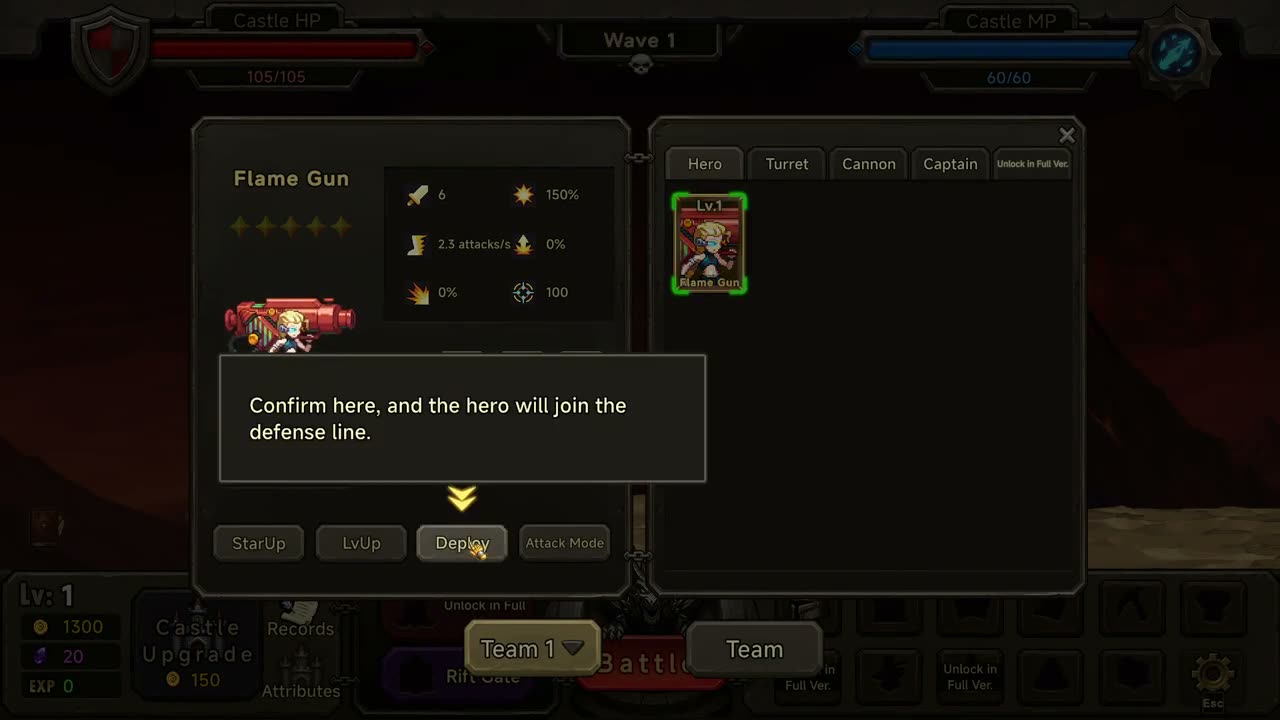
Castle level and hero level are separate purchases. Castle Upgrade improves the fortress and leads to additional deployment slots. To strengthen Flame Gun directly, return to the Hero tab, select Flame Gun and use LvUp. Read the Gold price beside LvUp; castle upgrades leave the character card’s level unchanged.
At Castle Level 5, click the highlighted cannon slot to open the Cannon tab. Select Siegebow and press Deploy. It sits on the castle alongside your heroes, but belongs to its own category. Return to that tab when you want to level the cannon; upgrading Flame Gun does not upgrade Siegebow.

During a battle, the red bar at the top left is Castle HP, while the blue bar at the top right is Castle MP. The numbered portraits at the lower right are your deployed units’ active skills. Read a skill’s tooltip for its MP cost and cooldown before using it. Flame Gun’s barrage deals Fire Damage and applies Burn, so it gives you an early way to damage a group approaching the castle.
After the first few defenses, follow the tutorial into the Mine. Pay the 100 Gold facility unlock, then read the two settlement rows. Human miners produce Gold; orc miners produce Diamonds. The hourly totals at the top show what the currently active settlements produce. An empty or locked Orc Settlement will not start earning Diamonds simply because the Human Settlement is working.
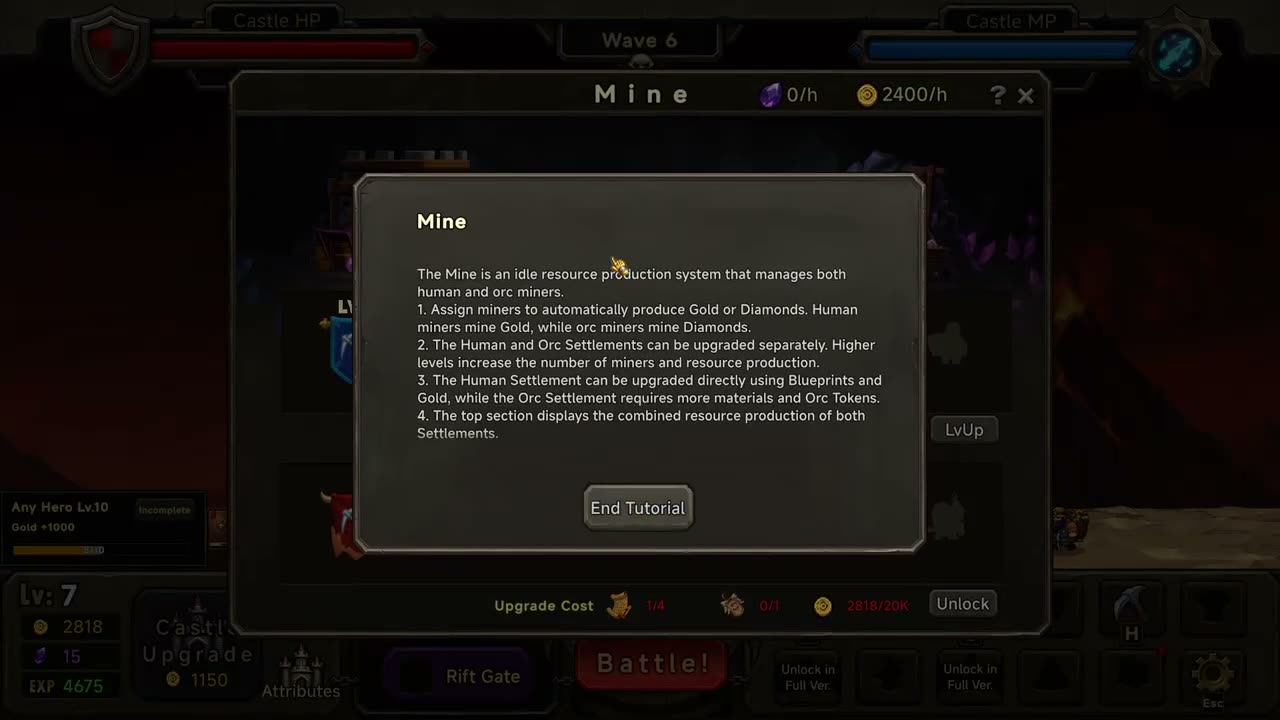
Upgrade the Human Settlement with Blueprints and Gold when you can afford its displayed cost. The Orc Settlement also needs Orc Tokens and its other listed materials. The early Training Grounds objective awards an Orc Token, so return to the Mine after claiming it. If the orc unlock is unavailable, inspect the missing material in that row instead of repeatedly paying for human upgrades.
Recruit defenders, then claim the objective rewards
Build the tavern when the tutorial introduces Recruit. Its opening draw gives you Blaze, a turret to place on the defense line. Open the Turret tab, select the unit and press Deploy, just as you did for Flame Gun. Use the Hero, Turret and Cannon tabs to manage each category separately.
The Recruit window offers one draw for 10 Diamonds or ten draws for 100 Diamonds in this demo. Ten draws can fill out the roster and gather duplicates in one purchase. Duplicate results can become shards used in StarUp.

After closing the draw results, inspect the new portraits in the character panel. Use LvUp to raise a unit’s ordinary level with Gold. Use StarUp to spend the shards shown beside its current star level. The star window previews the next attribute bonus or skill upgrade. Read it before spending shards, especially if the character is not currently deployed.
Keep claiming the objective card on the left side of the battlefield. Early tasks alternate between castle levels, hero levels, facility unlocks and deployment counts. A completed task needs a click on Claim before its currency or named hero reaches you. This is especially useful for the hero-level tasks that award a large Gold payment: collect the payment, then put it toward the next castle milestone.
Castle Level 10 adds Atomancer and a second hero slot through the objective chain. Select the newly obtained hero, level Atomancer and press Deploy. If a task asks for two or three deployed heroes, merely recruiting that many characters does not complete it. Check that the extra defender is on the castle and that its panel button now says Remove.
Castle Level 20: spend EXP at Training Grounds
Reach Castle Level 20, open the Training Grounds facility and pay its 1,000 Gold unlock. Then select a training icon and spend EXP with the red purchase button. The panel shows the current training level and the next bonus. Gold is still needed for castle and character levels, so having plenty of EXP does not make those other upgrades affordable.
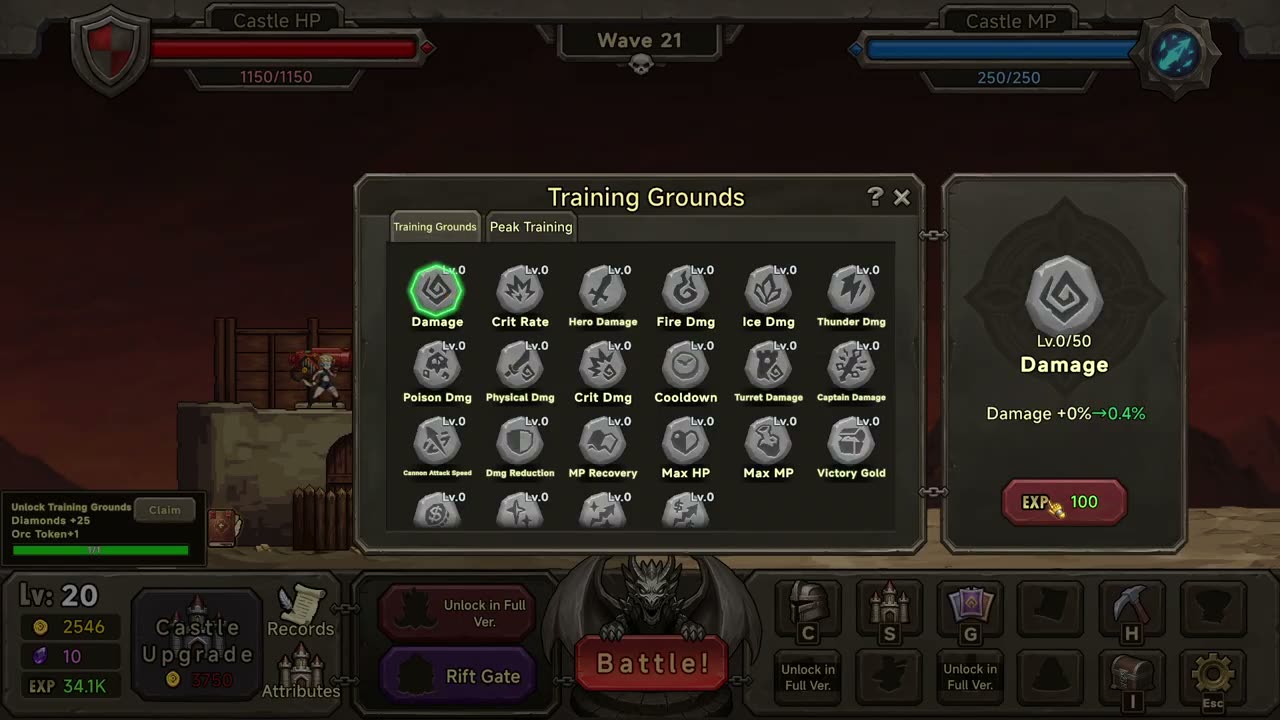
Damage and Hero Damage are useful starting options for a defense built around the early heroes. Add the elemental damage bonuses that match the units actually deployed. Flame Gun uses Fire Damage; Ice Angel gives you an Ice Damage dealer once her castle reward arrives. Spending EXP on an element absent from your current attackers leaves those attackers without that particular benefit.
The same panel has Turret Damage, Cannon Attack Speed, Crit Rate, Crit Dmg, Cooldown, Dmg Reduction, MP Recovery, Max HP and Max MP. Use the unit categories and the two castle bars to decide which purchase to make next. If the castle is losing HP while your stronger heroes remain underleveled, return to their Gold upgrades as well as considering defensive training. If you want to cast a skill but lack MP, buying another point of elemental damage does not supply that missing MP.
Do not spend on Captain Damage while your defense has no deployed captain. The button exists alongside the other training options, but it applies to the separate Captain category. Keep that EXP available for the defenders taking part in your current waves.
Castle Levels 30 to 90: fill each new slot
When the objective asks for Any Hero Lv.30, raise one hero to Level 30 and claim its 50,000 Gold reward. The example uses Flame Gun, then spends the payout toward Castle Level 30. Follow the later hero-level objectives the same way, while saving enough Gold to level and deploy the next reward hero.
Keep using the objective rewards to fund castle upgrades, then visit the relevant character tab whenever a new slot opens. The following milestones belong to the demo’s opening objective chain. Castle level is shown at the lower left; the wave number is at the top center, and the two numbers do not need to match.
| Requirement | What to add to the defense |
|---|---|
| Castle Level 30 | Claim Ice Angel and the third hero slot, then level and deploy her. |
| Castle Level 40 | Claim the second turret slot and deploy a second turret. |
| Castle Level 50 | Claim Shaman and the fourth hero slot. |
| Castle Level 70 | Claim Markswoman and the fifth hero slot. |
| Castle Level 90 | Claim the sixth hero slot and fill it from your roster. |

New reward heroes arrive at a low level. Ice Angel’s card, for example, shows Level 1 when she is first claimed at Castle Level 30. Give her levels before returning to the next wave. The LvUp menu includes larger purchase amounts, so inspect both the amount and the Gold cost before using a bulk upgrade.
The second turret is another easy upgrade to leave unfinished. After claiming the Level 40 slot, open Turret and deploy a unit into it. The illustrated defense uses Blaze beside Glacier, the blue tower. Keep both present on the battlefield when you next enter Battle!; a second portrait in the collection alone adds no tower to the line.

Castle Level 60: choose a connected talent branch
Raise the castle to Level 60 and pay 10,000 Gold to open the Talent Bureau. Talent Points come from stage progression, and the bottom of the tree tells you the wave for the next point. Click a reachable node to activate it, then follow its connected path toward the bonus you want.

For a Flame Gun defense, the Fire Damage branch gives a direct match to her barrage. The pictured tree begins with a Fire Damage node and follows the connected smaller bonuses. Hover over each node to read its effect before buying. Buy the connecting nodes before trying to reach a bonus farther along the branch.
Concentrate the early Talent Points in a branch that supports your deployed attackers, as the Talent Bureau tutorial recommends. If you invest in a damage type and later replace its attackers, revisit those points. Right-click an activated node to deactivate it and refund Talent Points, as described in the tutorial. The Reset Talents control is also visible at the bottom, but individual refunds let you inspect the branch you are changing.
Recruit skills can help you decide which damage branch to develop. Toxmaster’s Corrosive Potion reduces enemy Poison and Fire Resistance, while Flame Gun supplies Fire Damage. Read the support hero’s skill and the damage dealer’s skill together before replacing a leveled defender. If you choose Toxmaster to support Flame Gun, deploy both before returning to battle.
Wave 80: open the Rift without abandoning the main defense
The Rift facility requires Stage Waves 80 in this demo. Castle Level 80 alone does not satisfy that requirement. Once the wave requirement is met, open Rift Gate and pay 10,000 Gold to unlock the facility, then select a target in Rift Raid. Red Dragon is the first listed target; its selected panel shows the recommended power, rewards and entry cost.

The recorded Red Dragon attempt enters from the Wave 80 screen with a Level 90 castle. It ends with Defense Over and returns to Wave 80 with the roster and castle upgrades still present.

If the raid defeats your defense, return to the character panel, spend available shards on useful StarUp upgrades and raise the heroes you are deploying. Revisit Training Grounds with the EXP earned from ordinary waves. Then press the main Battle! button to resume the wave route. The example continues through Wave 80 and beyond after the failed raid, so defeating Red Dragon is not required to finish this opening progression.
Keep the selected target in view before entering another raid. Switching from Red Dragon to Fairy Dragon or Goblin King changes the recommended power and cost in the adjacent panel. Do not spend on a different boss simply because the first entry button was free. The bottom row of later bosses is marked for the full version in the demo.
Wave 85: open the Black Market and choose a purchase
Reach Stage Waves 85 and save 100 Diamonds for the Black Market facility unlock. Recruitment uses the same currency, so keep that unlock payment aside if you want to open the market at this point. Its products include Gold and Diamond exchanges, Blueprints, equipment Blind Boxes and material Blind Boxes. Open the tooltip before purchasing: a Bow Blind Box produces a bow of random rarity, while a material box serves a different purpose. The tutorial also says some products change with Castle Level.

Choose the weapon category your intended character can equip. In the example, a Bow Blind Box gives a Rare Rogue Bow with HP and Crit Rate attributes. Press Claim to keep it. Sell and Dismantle are separate choices on the result panel, so avoid either if you intend to equip the item.
Open the character panel, select Flame Gun and click her weapon equipment slot to enter the Warehouse. Select the claimed Rogue Bow there and equip it. The weapon then appears in the equipment slot and Flame Gun’s displayed Crit Rate rises. A box purchase by itself leaves the weapon unequipped.

If the claimed bow is missing from the Warehouse list, check the filters before buying another box. This screen can filter rarity, weapon type, substat count, main attribute and damage or defense substats. Clear an unwanted filter or select the weapon category you just claimed. The accessory slot is separate; the example’s empty accessory list does not mean the newly obtained bow vanished.
Check the quantity row at the bottom of the Black Market as well. It offers x1, x10, x100 and x1000. Return to x1 for a single box or exchange, then compare the product’s cost with the Gold needed for your next castle or unit level. The market’s Gold exchange can fund another milestone, but it spends Diamonds that could otherwise pay for recruitment.
Finish the first 100 waves and keep the next slot in sight
Resume the ordinary Battle! route after your upgrades. Watch for Victory and the next wave number before counting a defense as complete. The first 100 waves are finished when the game advances to Wave 101. Castle Level 100 is a separate milestone and does not establish that you cleared those waves.
During the push, keep collecting the left-side hero-level and castle-level rewards. The later opening objectives lead to a seventh hero slot at Castle Level 110 and an eighth at Level 130. As before, claim the objective, open Hero and deploy the extra character. These slots give you further expansion if ordinary waves start catching up with the current team.