
Follow Soldier E-19 into Habitation and find the Worker Access Keycard to open its main door. From there, repair the beacon, restart the Reactor and override the SCUs in Factory West, Waterworks and Containment Sector. Those three SCUs unlock the Central Elevator and the Lower Levels route to End of Abyss’s final boss.
If you want both endings on one save, finish the normal ending before collecting all eight Data Shards. The shard route at the end of this guide is for the return trip. This walkthrough covers the main story of End of Abyss, with the tools, shortcuts and fights needed to reach the finale.
Habitation: the keycard, beacon and first shuttle
Follow E-19 to the broken bridge and pull the nearby lever to extend the crossing. At the door locked from the far side, drop through the floor, smash the crates, and leave through the lower opening. Drop another ledge and crawl through the passage on the right. Break the crates at its exit, climb the ladder and pull the lever beside the locked door so E-19 can join you.
The next blocked door teaches the Energy Node mechanic. Activate the Scanner and trace the glowing cable from the door to its node, then shoot the node. Later doors have several nodes and cables that continue into adjoining rooms. Follow cables through adjoining doorways when they leave the room; the node may be on the other side. Ride the lift down and enter Habitation.
The Worker Access Keycard
From the hall with the triangle on the floor, take the upper-right door into the first Safe Room. Use the Restoration Pod and collect the Health Booster. The pod saves, heals Cel and refills the booster; its Workbench is initially offline. Leave through the other door, follow the passage to the stairwell, and climb to the next floor. Open the nearby shortcut doors as you pass them.
Follow the corridor through the cafeteria, where a corpse is leaning against a door. Take the passage above it and to the right into the storage room. Open the Ventilation Cover and crawl through. At the branch, head left to the room with two Infected Workers. Defeat them and take the Worker Access Keycard beside them. Unlock the exit from this room and use the corridor shortcuts to return to E-19.
The Block B Keycard is an optional nearby pickup: from the worker-keycard room, leave through its upper-right exit, head north and enter the room on the right. Clear the two workers and collect it if you want to explore Block B. The main Habitation Door needs the Worker Access Keycard. Open it, follow E-19 downstairs to the crew and interact with the cube.
The Power Converter and beacon
Go upstairs to the Communications Center Control Room and speak to Soldier C-12. Retrieve Map Data from the terminal on the left, then rest in the adjacent Safe Room. The tower route starts along the passage north of Soldier O-14. Descend the stairs into the Array Chamber and cross its metal walkways, climbing the ladders as you work upward.
Small Parasitic Fleas appear on this climb. Swipe them with the Knife before they surround Cel. At the staircase where a worker drops behind you, retreat far enough to bring both workers into view. Continue to the long ladder leading to the three Power Conduits. One has an empty slot with a red light.
Take the door on the right of the conduits. Follow the stairs and lower ladder to a broken railing, then drop to the glowing Power Converter. Picking it up triggers an ambush. Once the room is clear, use its bottom-left exit to return to the walkway and the long ladder. Insert the converter into the empty conduit and activate it. To return to C-12, descend the conduit ladder, take the right-hand route down the two lower ladders, and use the lift back to the control-room passage.
Riot Breaker and Husk Cluster
After speaking to C-12, return south to Habitation. Take the left-hand door off the main corridor toward Security. Vault through the open window on the right to enter the control-room area. Pull the lever, collect the Riot Breaker from the small room, then use the terminal in the next room to open the Shuttle Entrance. The Riot Breaker uses craftable ammunition, so visit the Habitation Workbench before taking the newly opened main door.
The Husk Cluster fight begins beyond the steps. Its jumps are slow enough to dodge away from, but the Husks spilling out of its body can surround you. Clear those enemies when they appear, then move in for Riot Breaker shots during the boss’s recovery. Collect the Vault Key after the fight and continue through the right-hand exit to activate the shuttle. Travel to Factory East.
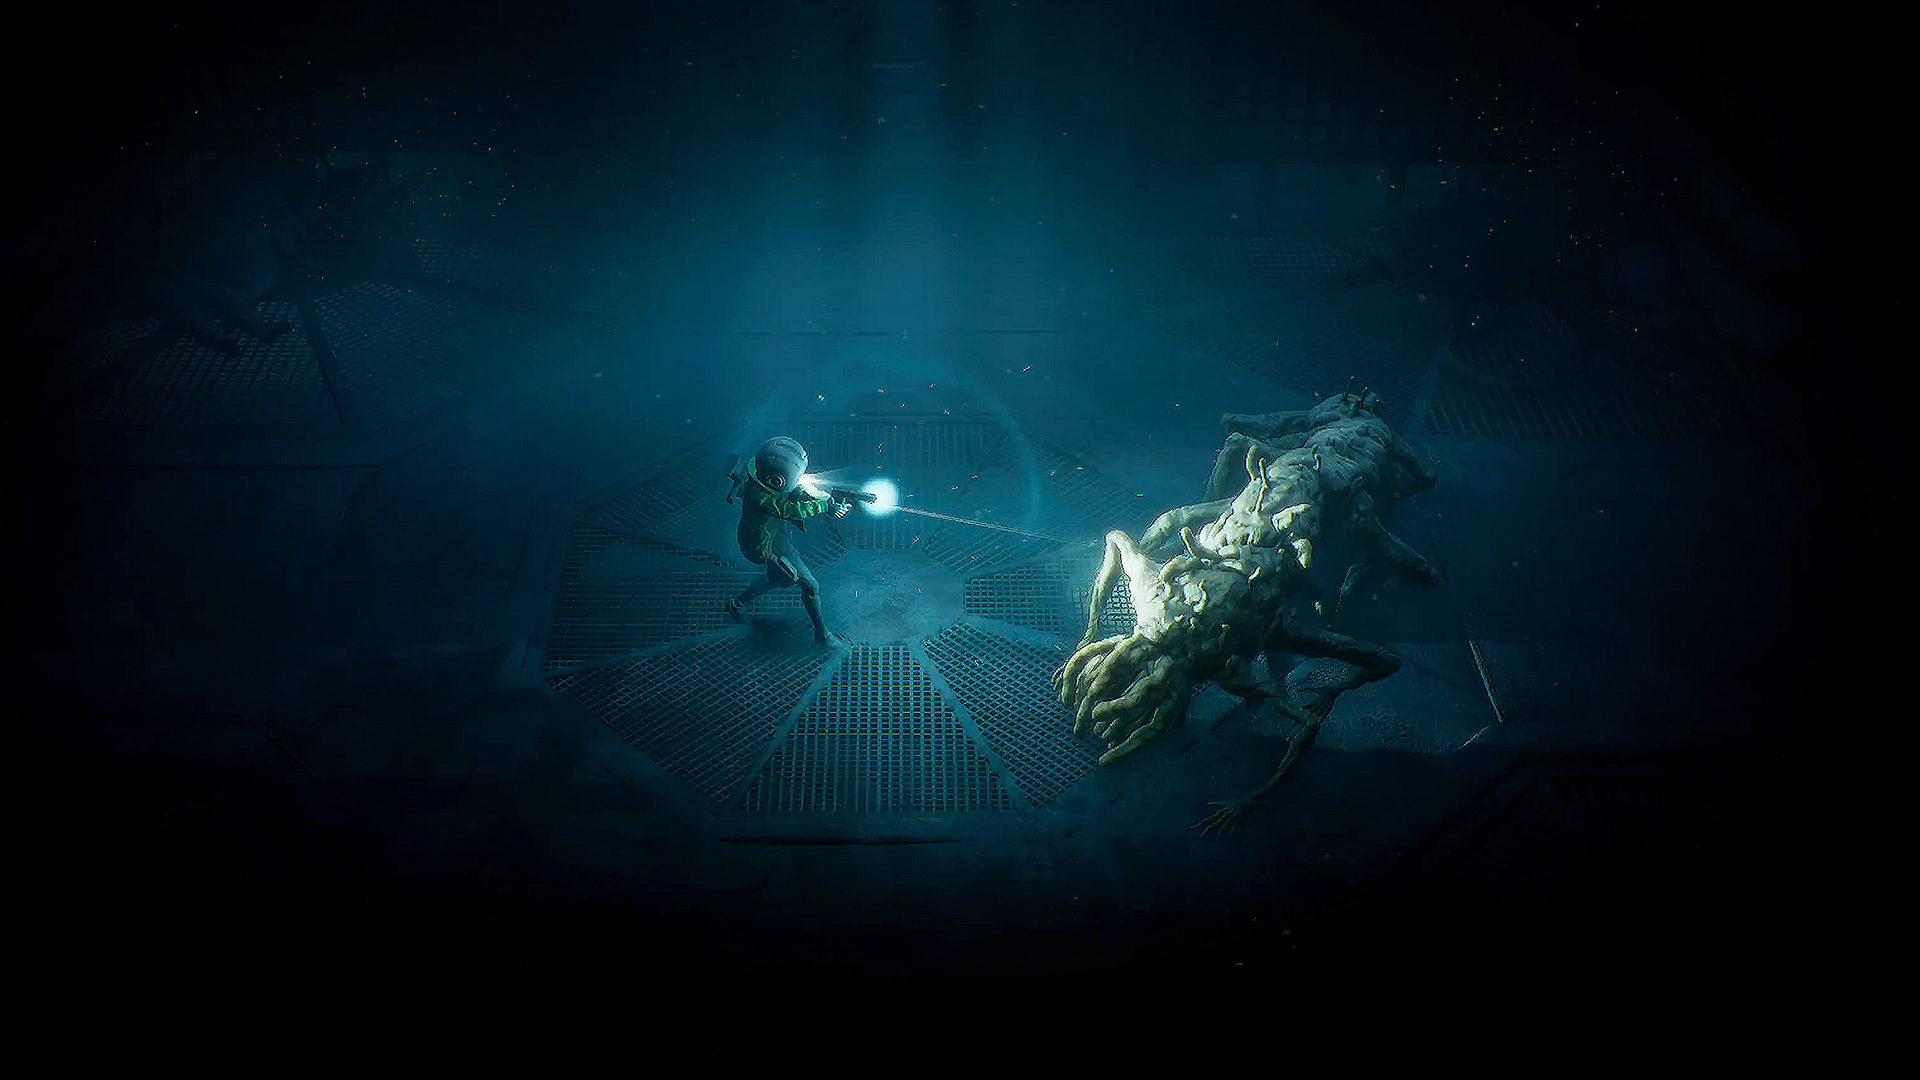
Factory East: restart the Reactor’s three Power Cells
Leave the Factory East shuttle, head south and enter the large room on the right. Its right-hand door with a yellow light leads to a Safe Room. Take the upper-right exit from the large room and follow the route toward the closed Reactor entrance. Collect the Factory Keycard beside the body at the dead end. You cannot open the Reactor’s main entrance yet.
Return to the Safe Room junction. The small room beside the shortcut ladder contains a Complex Alloy and a weak wall that you will open later for the Security Rifle. For the story, use the lower-right keycard door. Descend the stairs, cross the pipe-filled room and climb the ladder at its eastern end. Work along the upper walkway, turn right at the fork and pass through the small room. Open the shortcut ladder back to the Safe Room before taking the upper route into the Ventilation Tunnels.
In the tunnels, head toward the circular chamber at the northern end and descend its ladder to the Reactor route. A Health Booster is available beside a body in the accessible tunnels; collecting it gives you another heal between pod visits. On the Reactor approach, collect the Grenade and use the Safe Room off the right side of the hall. At the core, enter the central doorway, take the lift up and try the console. The failed startup adds the Power Cell objectives.
The security door and broken ventilation cover
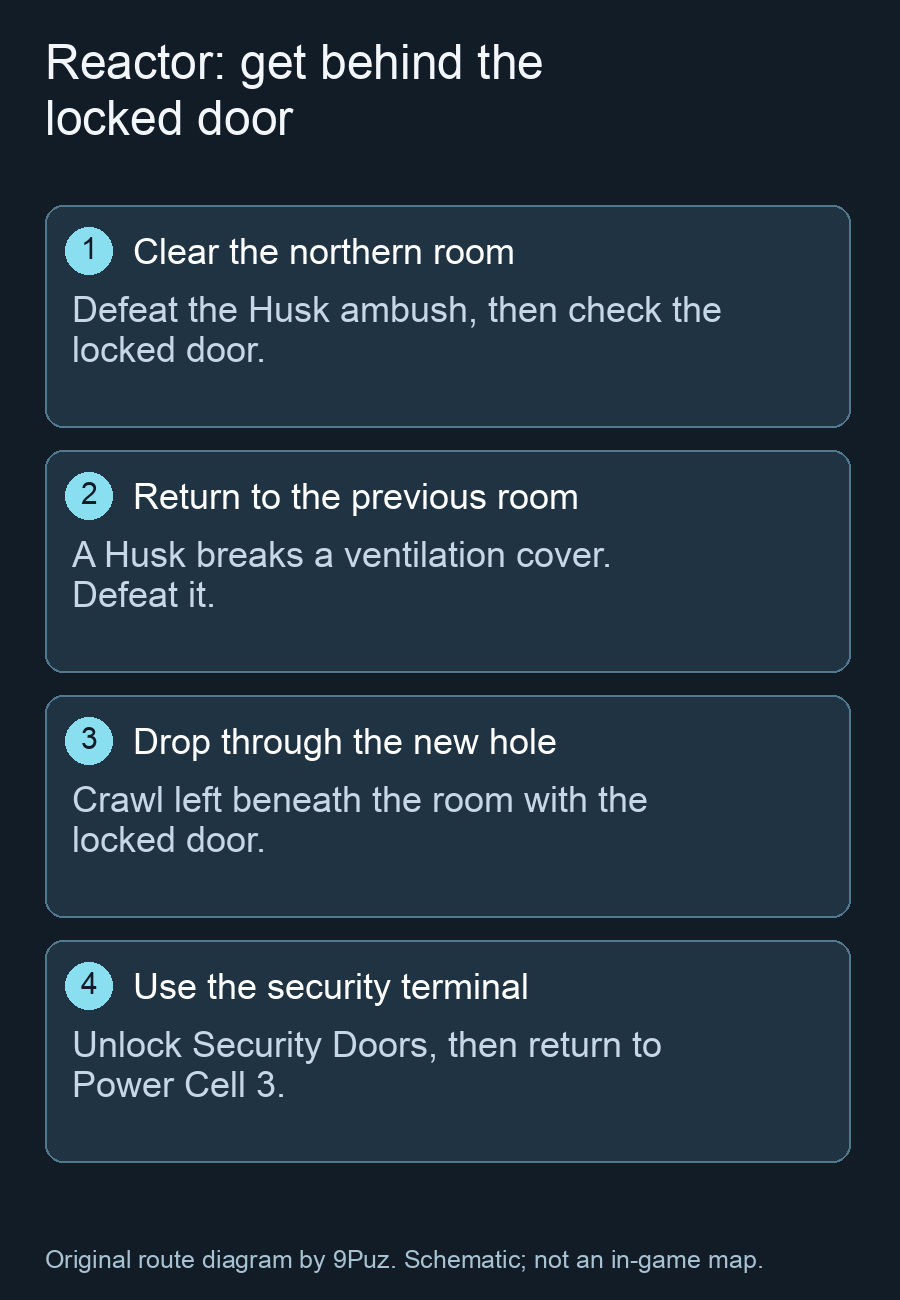
Take the core lift down, circle behind the Reactor and descend on the smaller lift. Activate the Power Cell in the room on the right, then cross to the room at the far left for the second. The third is behind the red-lit security door. From the second cell’s room, step back out and take the nearby lift farther down. Rest in the Safe Room to the lower right.
Follow the lower passages toward the security system. Infected Reactor Workers carry tanks on their backs that explode when shot. Chest Huggers can close the gap quickly; Riot Breaker shots and Grenades help stagger them. At the fork leading to a room with water below the walkway, open the door beside its lever to connect the route back to the Safe Room, then return to the fork and take the lower passage.
Collect Reactor Map Data in the room off the lower-left side of the next section. Continue to the large dark room where Husks ambush you near its northern door. Kill them, then check the door: it remains locked. Leave by the entrance you used. A Husk breaks through a ventilation cover in the preceding room. Defeat it and drop through that new opening. Follow the crawlspace left, underneath the locked room, to reach the terminal on the other side of the door.
Use that terminal to unlock the Security Doors. Leave through the newly opened left door and climb the ladder to reconnect with the lift and Safe Room. If you have reached the locked northern door but cannot find a way onward, revisit the previous room after the ambush; the newly broken ventilation cover is the passage you need. Refill your Riot Breaker ammunition before taking the lift up and entering the third Power Cell room.
Centipede Husk and the crew meeting
Activating the last Power Cell starts the Centipede Husk fight. During its first phase, it rushes across the room and retreats from view. Stay clear of its running line and fire when it crosses your aim. Its raised-body attacks include slams and a coiling grab; dodge as the attack commits. Throw a Grenade while it pauses for a slam, when you can aim at where it will land.
After the phase change, the centipede remains in the arena and adds a poison attack. Move around its flank and keep enough room to roll away from the next slam or grab. Collect the Vault Key after the closing sequence. Return to the console above the Reactor and activate it again. The Reactor objective finishes when you return upstairs and use the core console.
Go back toward Factory East. Defeat the Security Pods guarding the large doors, then take the newly opened left exit. Return to the first Safe Room junction, go through its lower door and descend the stairs. Approach the crew at the bottom-left of the next room. They need three more SCUs overridden before the Central Elevator can descend.
Factory West: Mechanical Crank, Explosive Charge and first SCU
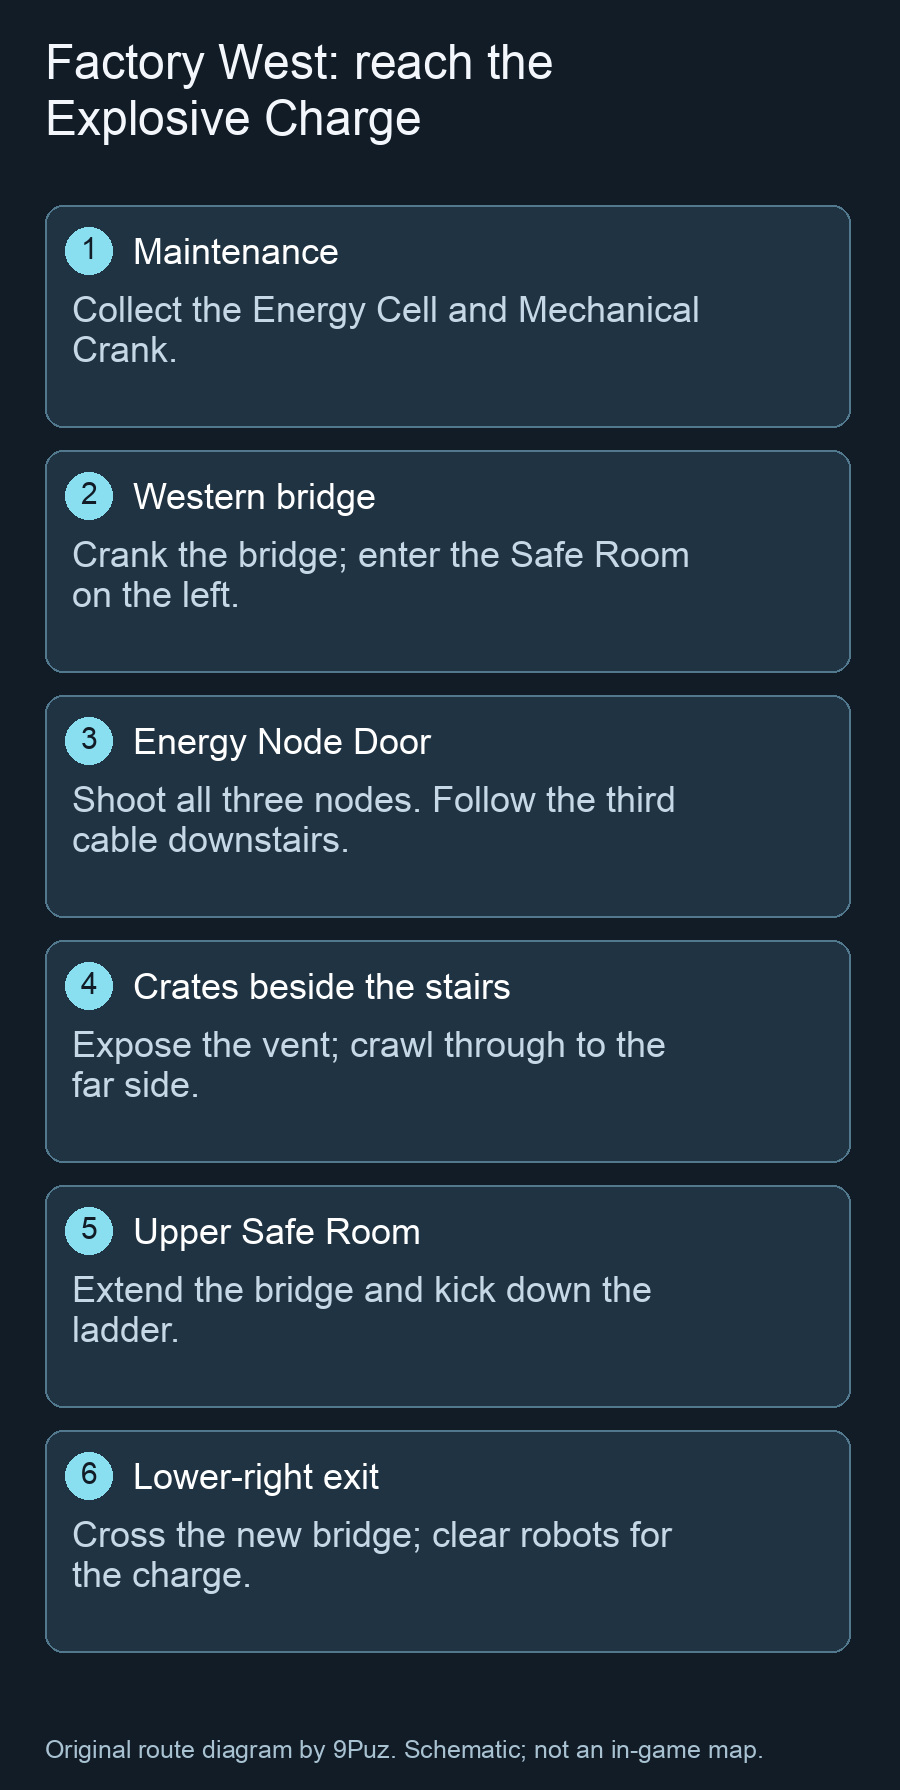
Leave the crew through the door on the left. In Factory West, follow the lower route through the Security Turret encounter, then continue right into Maintenance. Climb the ladder and take the left door. Defeat the two Security Pods and open the large item box for an Energy Cell. Take the cell now so you have room for the Radiation Protection Mod later.
Descend the right-hand steps and go through the doorway. There is a Safe Room below the junction; use it before taking the northern door into the next robot encounter. After clearing that room, use its far-left exit and collect the Mechanical Crank. Operate the bridge mechanism beside it, then retrace the route to Factory West. At the junction after the first turret encounter, take the western branch and extend its bridge with the crank.
Reach the upper floor of the Safe Room
The next gap has no usable bridge control on your side. Enter the Safe Room on the left instead, then leave through its other door and follow the walkway to the lower-left exit. Take the downward passage and turn right to an Energy Node Door. Scan and destroy all three nodes. Two are nearby; the third cable leads through the lower-left doorway into the infested room beyond the steps.
Beyond the node door, descend the right-hand steps and clear the robots. Near the small staircase leading to the right-hand door, destroy the crates to expose a Ventilation Cover. Crawl through the vents and emerge across the gap. Pull the bridge lever there, then take the nearby lift up. Clear the room where a Security Pod is fighting a Husk. Its right-hand route leads to the Factory West shuttle, which is worth activating before continuing.
Back in that upper room, take the left route and use the bridge panel. Cross toward the Safe Room’s upper floor and kick down the ladder. Exit through the upper-right door and extend the bridge outside. Descend the new ladder inside the Safe Room, leave through its lower-right door, and cross that bridge to the robot gauntlet.
Clear the Security Pods and turrets. When the grenade-throwing turret appears, move close enough to draw its explosives toward the turret itself. When the left door unlocks, enter and collect the Explosive Charge. This also unlocks crafting for replacements. Charges open Weak Structures on walls and floors; plant one, then detonate it or shoot it.
The route down to Security Sentinel
Return to the Safe Room and leave through the lower-left door. Cross to the weak wall beside the lift and blow it open. Pass through the control room and take the left route into the larger chamber. The upper-right door is locked from the far side. Use the left door above the steps, destroy the crates inside and open the trapdoor underneath them. Descend and collect the Health Booster from the box.
Follow the passage to the vent, crawl through it, and open the shortcut door on the left after the stairs. Use the right exit to reach the robot room with a central ladder and a Safe Room to the lower right. Clear the enemies and save. Descend the central ladder, head right and take the doorway above the steps on the right. Climb the stairs, take the left door and follow the route to a Weak Structure in the floor.
Before blasting and dropping through that floor, unlock the door on the left. It reconnects with the robot room beside the Safe Room and gives you a short return route after a death. Jump through the hole when your supplies are ready and head left through the large automatic door to Security Sentinel.
The Sentinel uses a beam, homing missiles and a close-range pulse. Roll clear of the beam’s firing line and keep moving around the missiles. If you fight close to it, watch for the pulse charge and roll as it releases. The second phase strengthens those attacks and adds an expanding wave to the pulse. EMP or armor-piercing attacks are useful here: use the Pulse Gun’s Charged Shot if you have bought that upgrade, or the optional Security Rifle.
After the fight, collect the Vault Key and leave through the right-hand corridor. Take the northern doorway, open the SCU door with its panel and interact with the cube inside. That completes Factory West’s SCU. Extend the bridge on the return route to reconnect with the opening tunnel.
Two useful detours before Waterworks
For another Energy Cell, return to the Safe Room where you dropped the upper-floor ladder. Bring two Explosive Charges, climb the ladder and leave left toward the earlier bridge. Blast the weak wall on the left. In the small room beyond it, descend and blast the second weak wall on the left. Open the box inside for the cell. The Factory West shuttle is down the stairs to the right of this route.
For the Security Rifle, travel back to Factory East and enter the small keycard room just left of the first Safe Room’s shortcut ladder. Blast its left wall and collect the weapon behind it. Open the adjacent door to create a shortcut directly to the Factory East shuttle. Hold Fire to focus the rifle’s armor-piercing shot. Keep some distance from the robots you target, since the small magazine and slow reload leave you exposed when enemies crowd Cel.
Waterworks: Operations Key, Drowned Husk and second SCU
There are two approaches from Factory East. The lower route through F1 reaches the first Waterworks Safe Room. This walkthrough uses the eastern entrance, which requires the Supervisor Key. In Factory East, follow the lower walkway east to a ladder, climb it and enter the room with a Security Pod. Destroy the nodes around the Energy Node Door on the right, enter and search the body for the Supervisor Key.
Descend the ladder again and continue east along the lower passage. Unlock the door above the small stairs with the Supervisor Key. Use the nearby upper ladder to reach a Safe Room, then descend the other ladder into Waterworks. Take the left door, cross the tank chamber and enter the chamber below it. Climb the right-hand steps and pass through the door across the bridge.
Extend the next bridge with the Mechanical Crank. Clear the Latcher and Husk beyond it, then head north. Open the far-left door to create a shortcut to your entrance ladder; take the right-hand door to continue. In the next room, the Safe Room is on the right below the steps.
Through the flooded passages to the workshop
Leave that Safe Room and take the door across the walkway to the left. The doors close for a wave encounter. Move around the central railing while clearing the room, then use the unlocked left door. Activate the panel beyond the bridge to lower the water below you. Take the door beside the panel and cross the overflow well.
Use the first left door in the next room to enter the dark flooded passages. Parasitic Worms can latch on to Cel, and Leechguts can emerge close to your path. Clear enough room to keep moving along the narrow walkway. In the larger room beyond, the two left doors contain a Complex Alloy and the Waterworks Map Data. Take the lower-right exit for the main route.
Pass through the next enemy room, take the lower door and follow the left branch of the passage. Move beneath the bridge and climb onto the platform to the left. The first right-hand doorway leads to a corridor ending at the other Waterworks Safe Room. Pull its lever to open the shortcut. Return to the platform room and take the right-hand door at its far end instead.
A Husk Brute guards the approach to the workshop. Use the railing on the left to keep a barrier between you and it while firing. Enter the workshop once the route is clear and take the Operations Key from the table. Return to the newly connected Safe Room to rest and craft ammunition.
Drowned Husk and the water-flow console
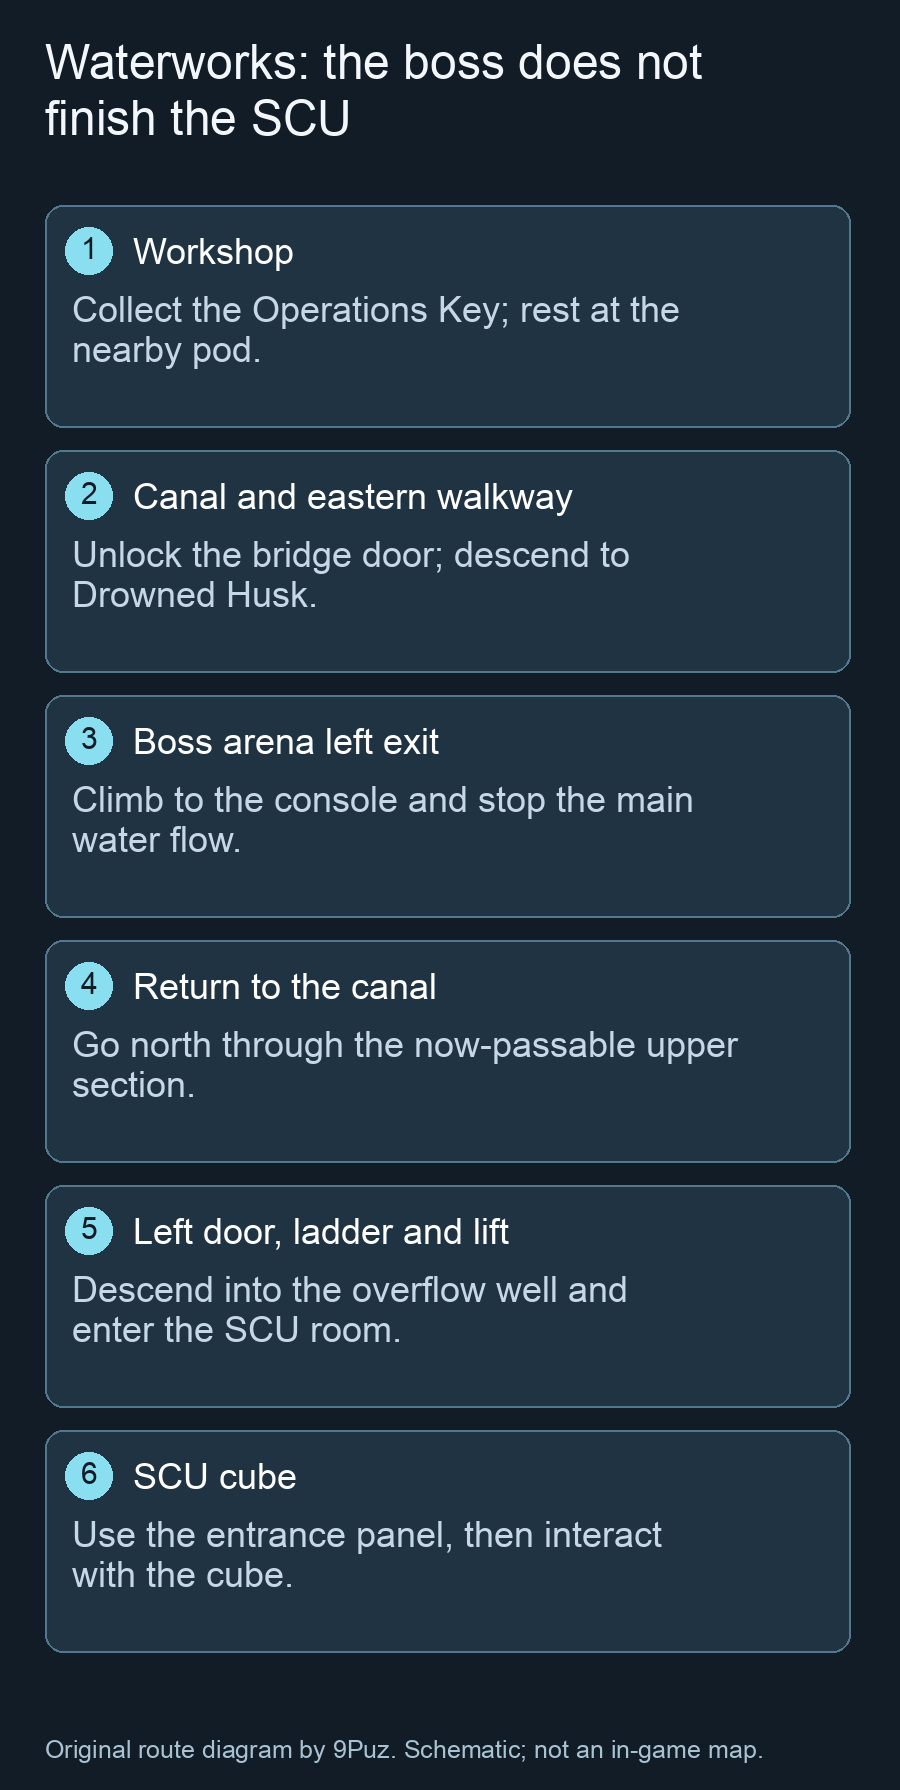
Leave the Safe Room through its right door and follow the flooded passage down and right to the canal. Drop into the canal through the broken railing, head north and climb onto the walkway on the right. Climb the stairs and use the Operations Key at the door across the bridge. Descend both ladders, circle the lower walkway and take the next ladder down. Enter the broken wall to start the Drowned Husk fight.
Keep room between Cel and the boss until it commits to a dive. Dodge past it and use the recovery to fire the Riot Breaker. When it staggers and the interaction prompt appears, move in for the Knife attack. After its mid-fight cutscene, the boss picks up a pipe and gains longer reach. Dodge sideways or through the attack; a backward roll can still leave you within the pipe’s swing.
Collect the Vault Key after winning. Take the far-left exit, climb the ladder and follow the passage to the control panel. Activate it to stop the main water flow. Leave through the right door and drop the ladder to open the shortcut. Return to the canal where you climbed out earlier. The stopped current now lets you reach its northern section.
Enter the door on the left of that upper section and descend the ladder. Follow the passage to the lift, ride down into the overflow well and open the door at the bottom. Use the panel at the SCU entrance, then interact with the cube. The SCU activation completes this part of the elevator objective. If the Waterworks marker remains after Drowned Husk dies, return through the drained canal to this room.
Containment: equip radiation protection before going deeper
From Waterworks, head to its far-eastern room with the paired controls and a dam. Use the first panel to lower the crossing, walk over it and climb to the second panel. Lower the dam, return across the crossing and use the first panel again to open the lower route. Descend the ladder and follow the newly drained passage toward Containment Sector. The first Safe Room is on the right after the entrance ladder.
Activate the Containment shuttle early. Leave the Safe Room, head left to the junction, then follow the long passage toward the right-hand door at its end. Climb the stairs and continue past the circular entrance. Clear the two workers and activate the shuttle panel. This gives you a quick return after collecting the mandatory radiation mod.
Basement Keycard and four Suit Power
Return to the passage near the first Safe Room and take the left branch toward Factory East. Collect the Basement Keycard beside the body and extend the bridge using the panel. Cross, open the large door with its lever and head left through Factory East. Clear the turret room, continue to the ladder and descend. Head right toward the Supervisor Key entrance to Waterworks.
At the growth-covered basement approach, descend the metal stairs and ladder. Open the nearby shortcut back toward the keycard bridge before entering the lower room. Use the Basement Keycard on the door toward the foreground. Clear the Husk Brute and Infected Reactor Workers inside, then take the left door to collect the Radiation Protection Mod.
Equip it at a Restoration Pod before taking Containment’s critical radiation route. It needs four Suit Power, so remove other mods if they leave too little power available. Each Energy Cell raises your capacity by one. If your capacity is still too low, collect the Energy Cell in Maintenance and the cell behind the two Factory West weak walls described above. Check that Radiation Protection is equipped before leaving the pod. Once equipped, it reduces the incoming radiation damage. Use the shuttle to return to Containment once it is fitted.

Find the Grappling Hook
From the shuttle, head left to the circular entrance and take its left doorway. Climb the passage, clear the Burster and enter the left room. Use the lower-left door and cross the room with a Spitter. Climb the ladder on the left, follow the upper passage and pull the wall lever to open the shortcut door below. Descend and pass through that door.
Follow the overlooking passage north, descend the stairs and clear the Armored Mass. Its protected front deflects your attacks. Dodge its charge beside a wall, then circle behind it while it recovers from the collision. Take the left door at the upper end of this section and ride the lift down. Cross the dark lower rooms until you find the locked door and a ladder nearby. Climb that ladder, then the stairs, and enter the hole in the wall to reach the next Safe Room on your right.
Leave the Safe Room through the left door, descend the steps and clear the Corroder encounter. Take the irradiated passage on the right, go upstairs and clear the enemies in the adjoining room. Drop through the broken floor in the following room. Clear the Spitters, Husks and Corroder to release the lockdown, then enter the right-hand room and collect the Grappling Hook.
Use it to pull down the ladder in the ambush room, climb to the control room and leave through its right door. The nearby service-key door is optional for this return. Climb the stairs, activate the anchor points with the lever and grapple across to the circular-entry room. You can now also cross the gap beside the earlier Spitter room to reach Containment’s Map Data terminal.
Set the bridges, then retract the northern crossing
Return toward the first Corroder area and use the Grappling Hook to lower the ladder on its far-left side. Climb, enter the hole in the left wall and head north through the critical radiation zone. Keep the Radiation Protection Mod fitted. The western branch reconnects with the Reactor; take the northern stairs for the SCU route.
At the bridge room, clear the worker beside the first control and extend the crossing to the central platform. Use the northern control to extend the route toward the northern exit. Reach that exit using the bridge, stairs and drop beside it. The next Safe Room is on the right.
Leave through the opposite door and defeat the two Armored Masses on the long bridge. Let them hit the walls and attack their backs, or throw Grenades behind them. Take the left exit, climb the stairs and clear the Corroder. Activate the anchor control beyond it. A grapple across the nearby gap leads to a body holding the Containment Service Key; shoot the body down if you want that shortcut.
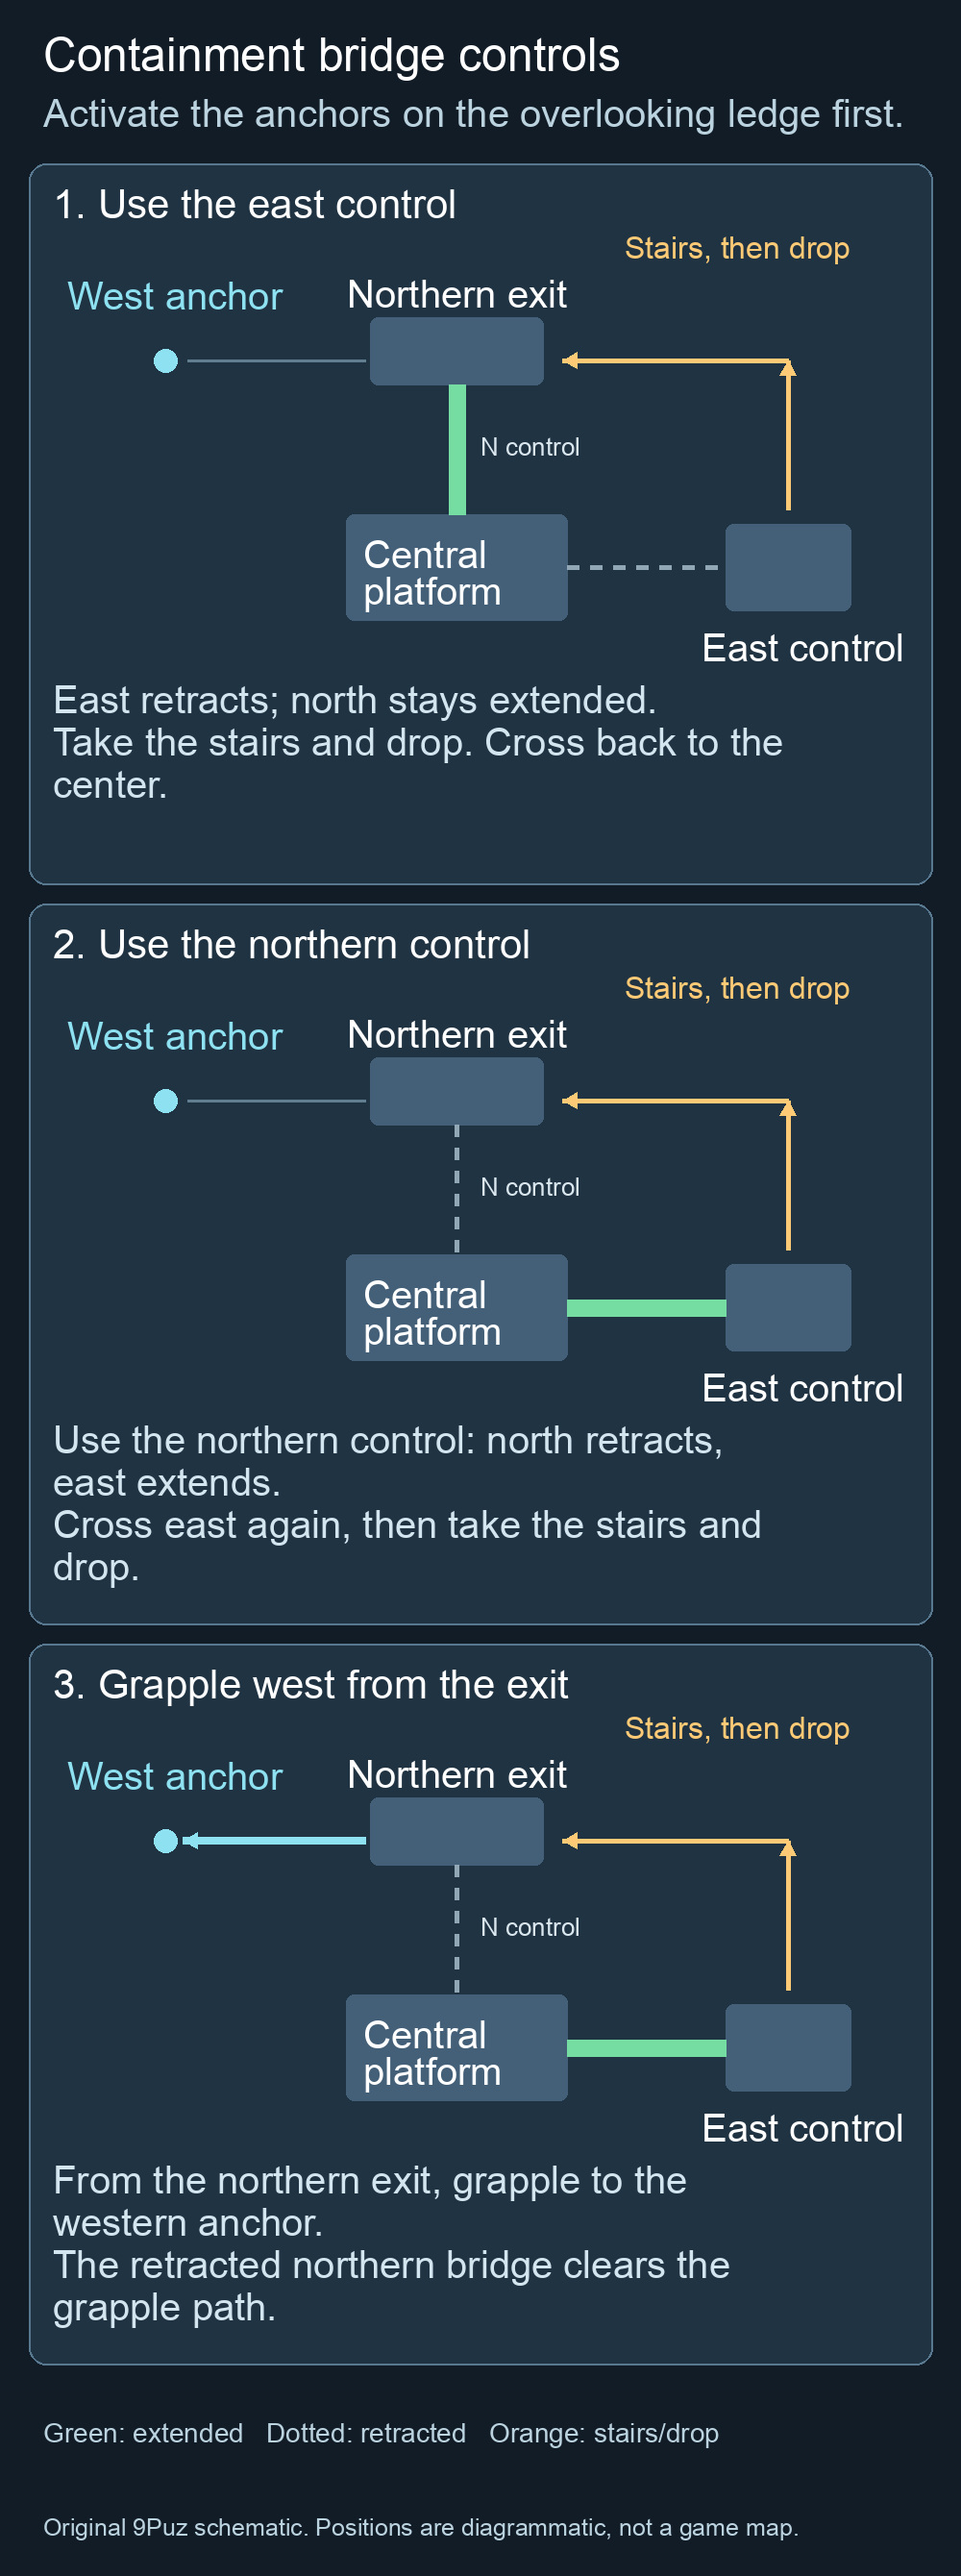
Continue through the opening to the right to reach the ledge overlooking the original bridge room. Use its panel to activate the anchor points below. Climb the stairs and take the lift down to reconnect with the bridge area. Retract the northern bridge to clear the path to that grapple anchor.
- Cross the eastern bridge and operate its control to retract that crossing.
- Use the eastern stairs and drop beside the northern exit to return to the central platform.
- Operate the northern control to retract the northern bridge and extend the eastern bridge again.
- Cross east, climb the same stairs and drop beside the northern exit once more.
- Grapple to the western anchor across the space vacated by the northern bridge.
If the grapple route is still blocked by a bridge, return to the central control and retract the northern crossing. If you cannot target an anchor, go back to the panel on the overlooking ledge and activate it before changing the bridges again.
Remote lever and Radiation Host
Follow the new route down the ladder and across the next walkway. Grapple over the gap ahead and clear the Glowticks. A body above this room holds another Energy Cell. Continue through the right-hand door, clear the worker room and climb its ladder. Drop to the ledge with a switch and operate it to extend the bridge on the floor below.
Drop again, cross that bridge and climb the ladder at its far end. Open the left-hand shortcut door with the lever. From the ledge, use the Grappling Hook on the switch across the gap. It changes the bridge arrangement so you can cross to the right-hand door. Follow the route to the circular containment tank. Take the small lift on the left first to open a shortcut back toward the second Safe Room, then descend through the tank opening to the boss.

Radiation Host’s attached Glowticks restore its health. Use the Grappling Hook to pull them off and kill the detached ticks with the Knife. Keep removing them until the healing stops, then use the boss’s slow movement to land Grenades and sustained fire. Avoid standing within its charged radiation area or beside its melee attack.
After the fight, collect the Vault Key, leave to the right and descend the ladder. Take the northern door along the corridor, open the SCU entrance with its panel and activate the cube. C-12’s transmission confirms the Central Elevator is operational. Return to the crew in Factory East, speak to E-19 and select Lower Levels at the elevator.
Lower Levels: release both protocols
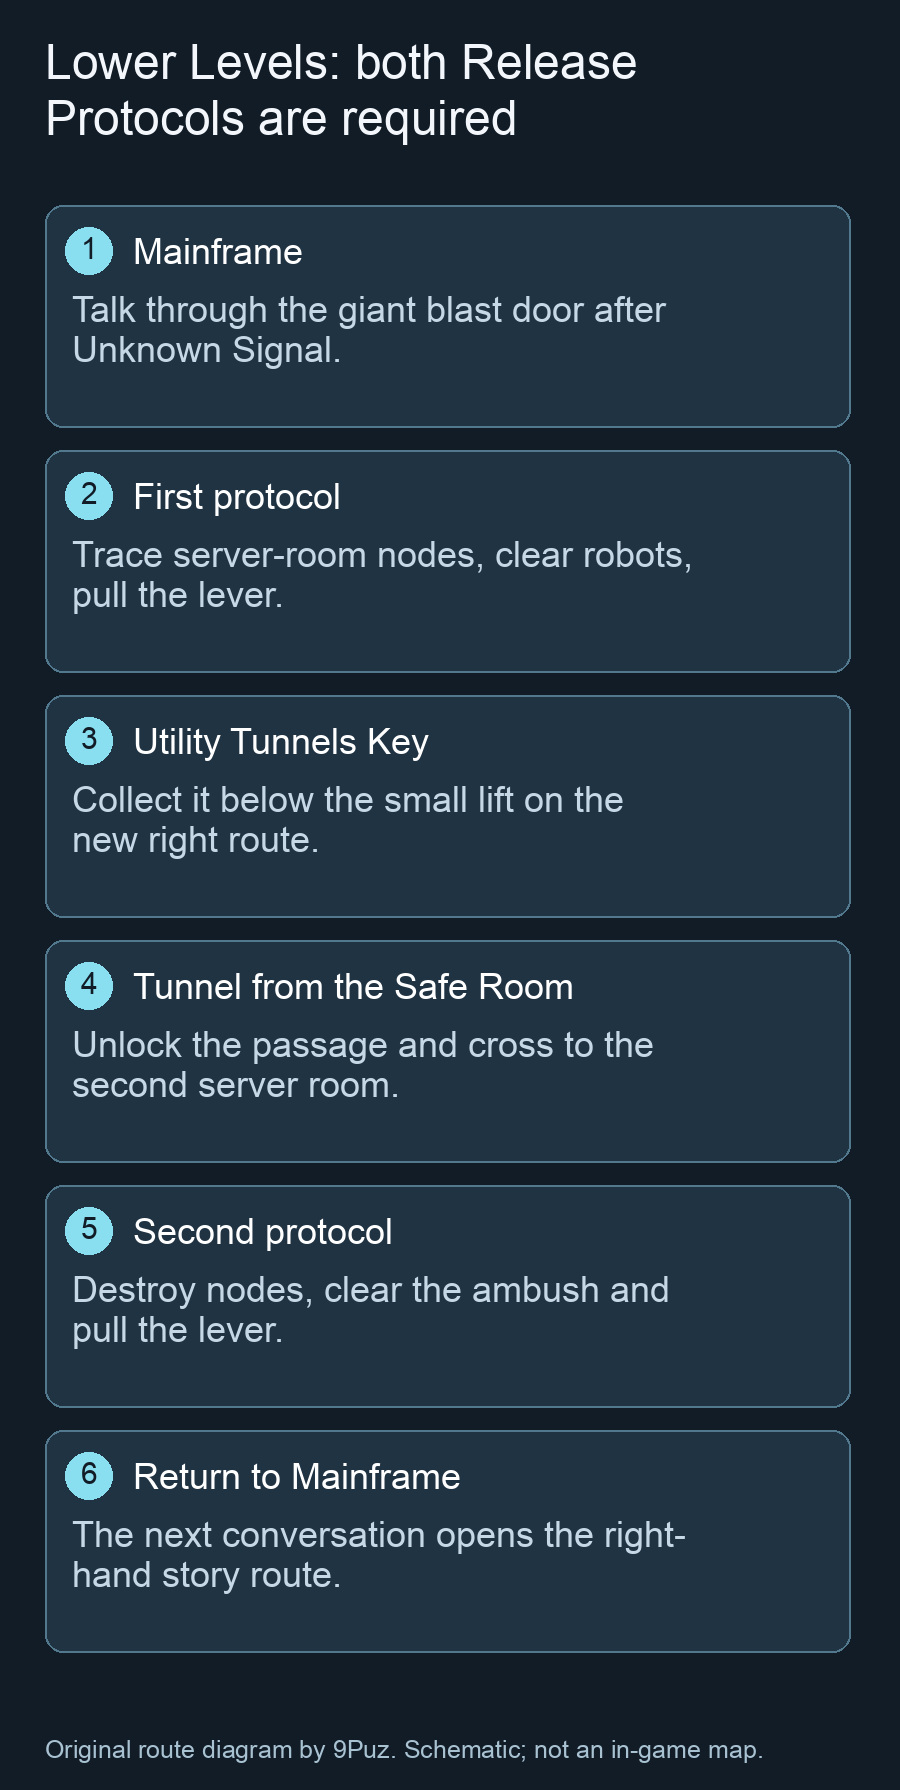
Follow the crew until the next cutscene ends and Cel receives Unknown Signal. Take the left doorway, use the Safe Room and descend on the lift. Approach the huge blast door below and speak to the Mainframe inside. Your next objective is to release two protocols.
Leave through the blast door and follow the left route to the next Safe Room. Enter the room beyond its left door, then take the northern door toward the Energy Node lock. Scan its cables back into the preceding server room and shoot all three nodes. Defeat the Security Pods and turret that appear, then enter the unlocked northern room and pull the first protocol lever.
Leave by the newly opened right-hand route and take the small lift down. Collect the Utility Tunnels Key from the body on the right. Return to the Safe Room and descend the stairs outside it. Unlock the tunnel door with that key and cross the Husk-filled passage. At the stairs on the far side, open the shortcut back toward the Mainframe before taking the right-hand doorway.
The second protocol repeats the server-room lock: scan the door, trace the cables into the preceding room, destroy the Energy Nodes and clear the ambush. Enter the unlocked room and pull the lever. Use the left exit and its shortcut lever, then return to the Mainframe. Both levers must be used before that conversation opens the next story route.
Ride the lift back up, rest in the first Lower Levels Safe Room and return to the hall where Unknown Signal began. Its right-hand door is now available. Take it, follow the eastern passage and descend on the small lift at the end.
Level 1 Access, Incinerator and the final two bosses
On the lower metal walkways, follow the passage until an Unformed Specimen drops from above. Use the right-hand door, then the lower passage and the door on its left. Cross the next catwalk room to the far-left ladder and descend. Collect Level 1 Access from the body at the bottom. The ensuing Unformed Specimen ambush is easier to escape than to fight with your current weapons.
Return to the passage where the first specimen dropped and take the northern door. Rest in the Safe Room on the right, then use Level 1 Access on the left door. Run past the specimens, climb the stairs and take the upper-right doorway. Follow the passage into the left room, call its lift and ride up. Open the shortcut on the lower-left side of the upper room, then enter the middle doorway.
The next room locks down for a fight involving Head Crawlers. These enemies can grab Cel and revive dead Husks, so take them out promptly with the Riot Breaker or Grenades. After clearing the room, use the left exit and collect the Incinerator in the passage above. Use its flame against Unformed Specimens and the Parasitic Growth blocking doorways. Craft Incinerator ammunition at the northern Safe Room before opening the boss route.
Failed Experiment
Leave that Safe Room toward the right. Cross the specimen-filled rooms, use the upper-left exit and then the right-hand door at the next turn. Follow the lower passage east past the ambush. Beyond the next door, a Parasitic Growth blocks the boss route. Before burning it away, take the lower-left route and open the shortcut back to the Safe Room.
Burn the growth and enter the arena. Failed Experiment is vulnerable to the Incinerator, but additional Unformed Specimens join the fight. Circle them while applying flame to the boss, leaving yourself a clear route between the arena’s obstacles. The explosive containers provide another damage opportunity when the boss moves beside one. After the fight, leave through the left door and collect Creation Project Access, the keycard for the Neural Chamber route.
Fractured Being
Return to the original Lower Levels hall and use Creation Project Access to unlock the northern door. Continue to E-19’s body in the triangle-marked room. Open the right-hand shortcut to the Safe Room before entering the northern doorway. The final fight begins after the passage and cutscene beyond it.
In the first phase, Fractured Being closes for delayed slams and short-range swipes. Hold your roll until the attack releases rather than dodging as soon as it raises its arm. Dodge the ground shockwave sideways or through it. If Cel is knocked down or grabbed, respond to the on-screen button prompt to escape. When particles gather for the gravity attack, deal impact damage quickly to interrupt the charge; the Riot Breaker is useful for that opening.
Emptying the first health bar starts a second phase. The boss attacks at range with tendrils, sometimes chaining two strikes. Wait for the strike to release, roll and watch for the follow-up before firing again. Its circular shockwave expands outward from the center; roll toward the boss through the wave. Continue taking shots between these attacks until the second health bar is empty and the ending sequence begins.
After the normal ending: eight Data Shards
For the secret ending, gather eight Data Shards and deliver them to the Mainframe on Lower Levels B3. You must then defeat Fractured Being again. Return for the shards after finishing the story. Completing all eight before the normal ending can lock you out of that ending’s achievement on the same save.
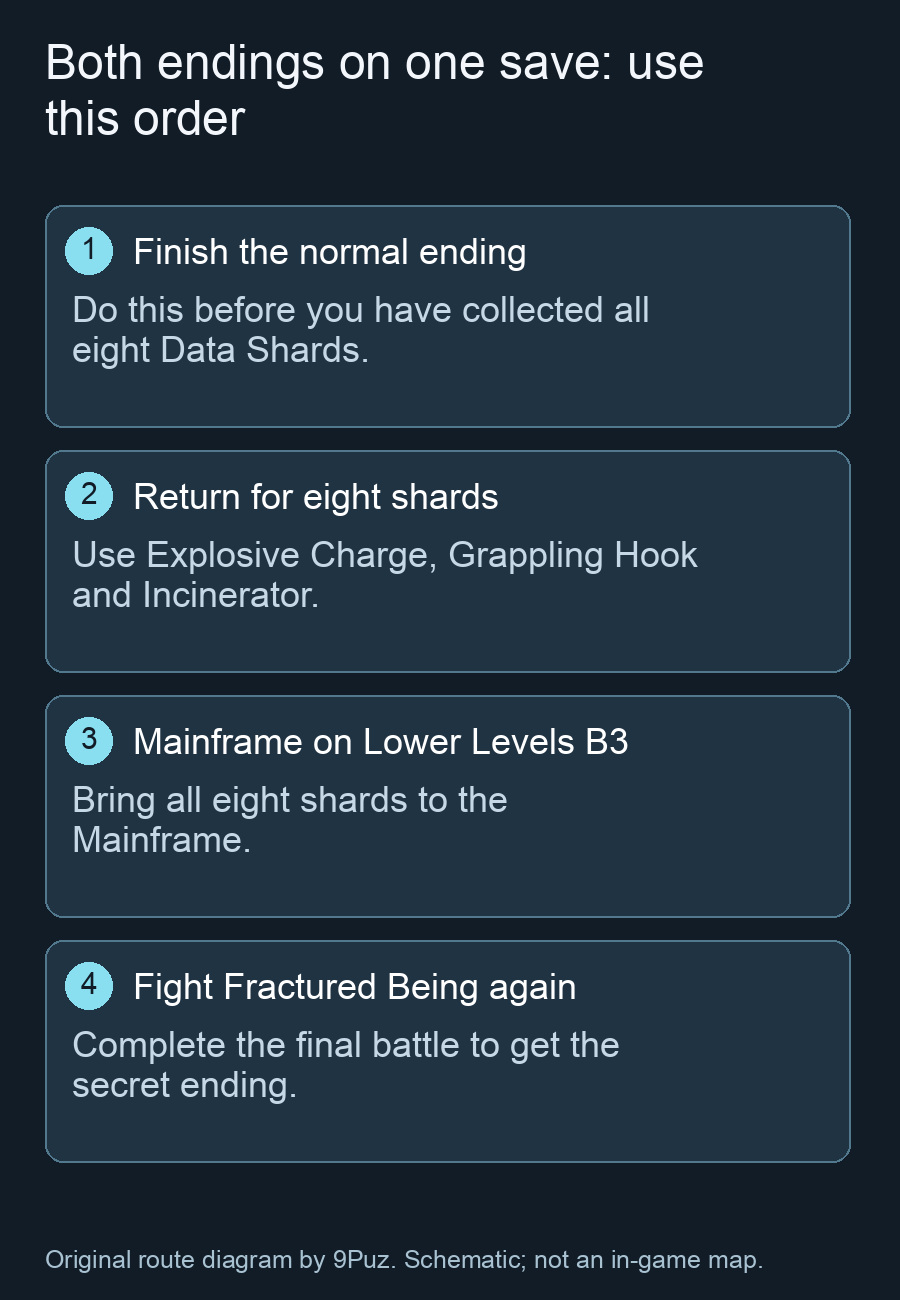
You will need the Explosive Charge, Grappling Hook and Incinerator for this return route. The locations below use the floor labels on the map. They cover the shard requirements, rather than every optional vault, boss or Logbook entry.
-
Lower Levels F1: burn the Parasitic Growth in the northern hall with the Incinerator. Collect the shard beyond it.
-
Habitation Sector F1: blast the weak wall just left of Containment’s shuttle to obtain the Security Guard Keycard. In Habitation, use it at the door on the right end of the corridor. Descend the stairs and take the left door for the Security Chief Keycard. Return to the main hall, open its left door with that card, and use the northern doorway to reach the shard.
-
Ventilation Tunnels F3: blast the weak wall to the right of Factory East’s easternmost tunnel entrance. Follow the passage east into the tunnels on F2, follow the catwalk on the upper floor, then lower the F3 ladder with the Grappling Hook. Go to the far-right stairs and defeat the ambush for the Ventilation Maintenance Key. Use it at the northern F3 door for the shard.
-
Factory West F4: blast the weak floor outside Maintenance’s Safe Room. Descend into Outer Sector and head west to find Executive Level Access behind crates. Return to Factory West F2, unlock the lift with that keycard and ride up. Enter the room beyond the first one upstairs; look for the shard beside the large table.
-
Reactor B1: start in Waterworks B3. Pull the wall switch in its western room, then use the control on the right of the northern circular structure to lower the water. Activate the pump in the eastern console room. Leave that room through its left door, descend the ladder and follow the passage north. Blast the wall at the dead end to clear the blockage. Take the route from B3’s upper-right doorway, open its Energy Node Door and clear the ambush to reach the Reactor Pool drainage switch. Return to Reactor B3, descend into the drained pool and take the left path to the locker holding the Underbelly Key. Use it on the door below the small stairs on the eastern side of Reactor F1. The shard is inside.
-
Waterworks B3: collect the Sewer Workshop Key on the western side of the sewer section. Unlock the small workshop at the southern end of the sewers and take its shard.
-
Containment Sector F3: blast the weak wall on B1 and enter the room beyond it. Use the Grappling Hook to lower the ladder, climb and collect the Storage Room Key. Return to F3 and open the storage-room door with it for the shard.
-
Lower Levels B4: descend the stairs in front of the B3 Safe Room into the tunnels. Burn the growth roughly halfway through the passage and collect the shard behind it.
With all eight collected, revisit the Mainframe on Lower Levels B3. Complete the conversation there, then return through the Neural Chamber route and defeat Fractured Being again to trigger the secret ending.